Worried About Electroshock Therapy in Tough Mudder? Do This.

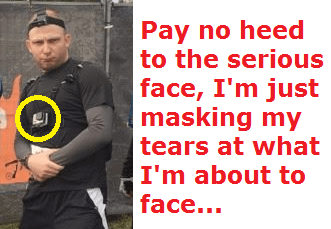
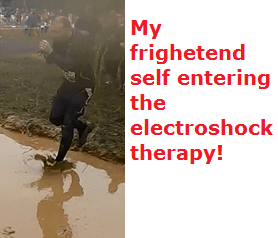
There were 2 obstacles I legitimately feared going through in Tough Mudder and one of them was electroshock therapy. I have a video of myself passing it.

However, after I was yelled at by my uncle to just dash through it and hardly feeling the zaps hitting me, I discovered that there was a great way to do it.

tough mudder electroshock therapy

Compared to how awful the experience was in MudmanX where I was shocked much worse, the one on Tough Mudder was MUCH less terrible (in MudmanX, I was crawling with my head exposed to the wires, in the other, I had to run through and my feet were what was exposed to the wires).

So why is it that in one I was shocked a lot more than in the other and more importantly, why is that so many people get zapped like crazy in electroshock therapy and what can you do to prevent it? Here are my theories:

1) Less skin exposed to the wires means less static electricity:

Every person I saw running through in shorts, without a shirt, basically with substantial areas of skin exposed got shocked like crazy in this obstacle.

Why is it that more skin exposed causes more shocks? Well my theory is that the hair on all exposed areas is basically a static. It makes it easier for the wires to zap you. 

2) Wear layers of clothing that is rubber like:et

It wasn’t until after I did electroshock therapy, the adrenaline went away and one of my teammates pointed out that by wearing rubber like clothing, basically rash guards and leggings, it reduced the pain of the zaps tremendously that I realized that I only got zapped twice and hardly actually felt it.

The shocks I experienced from MudmanX was enough to drop me, while the ones in the other race were felt, but didn’t halt my movement. 

There were people like my uncle, his friend and myself who wore fully clothed fabric that went through this obstacle easily. Then there were the others who didn’t wear enough that didn’t and we know what happened to them. What to wear to get less zapped.

3) Do NOT wear anything that is made of wool.

You’re asking yourself for a bad experience if you do. Wool naturally attracts static as does exposed skin. Besides, I can’t think of any reason to wear wool on a mud run, any mud run for that matter…

4) Understand that you can BYPASS this obstacle.

While there are rules in Tough Mudder that say you “can’t” skip obstacles unless you’re in the legionnaire club, the truth is that they put up a board that says who this particular obstacle is not for:

Basically people with health problems and fillings in their mouth (metal). That said, if you have these problems, you shouldn’t be doing this obstacle at all.

I personally have 2 crowns and some metal work done, but I still went in and did it. I would not recommend someone who knows in advance that they have these fillings or health problems (heart) do it. 

So if you do have these, let whoever is in charge of regulating the runners inside this challenge know. They can’t force you to do electroshock therapy. 

The same goes for other obstacles, such as this

As far as I also know, if there are no legitimate reasons for you to skip an obstacle, the staff won’t force you to do things like burpees which you do have to do in the Spartan Race (I admit, I weaseled out of a few of them!).

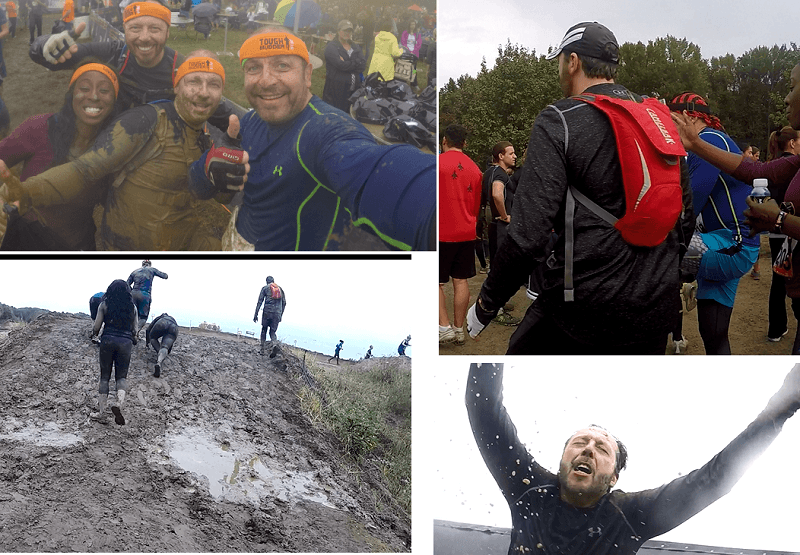
Also I did another Tough Mudder race a few years after this one, and because I suffered a big injury right before electroshock therapy, I decided to skip it.

5) By the time you reach this area, you’re going to be very tired and desensitized. 

Generally this is the last obstacle on Tough Mudder and when you get to it, you’re covered in a lot of mud (which can also help prevent extra zaps) and are very tired. Use that to push you through this and know that the finish line is close shortly after! 

Are there any ways to practice for this?

Not any safe ones that I know of so don’t try doing something stupid like tasering yourself before hand. This is not a productive way to prepare for this. 

The only thing I would say is: Wear that clothing and dash as fast as possible through it. Tough Mudder often likes to mix up the way they structure this obstacle. For example:

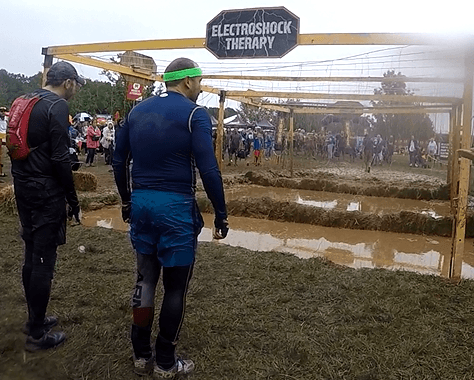
They may make it a long dirty an slippery run without water, but you have to dash through about 20-30 feet of wires.

In mine, it was also about 30 feet, it was in about a foot of water and about 10-15 feet you had a little mound to jump on top of. That’s where I slipped and then had to crawl through to finish. 

Other than that, wear something that’ll make it less likely to slip. My salomon speed cross 3 saved me on this. But in the video I’ll show you of me doing it, I was running through without any issue, and then somehow I slipped…

Here you go, enjoy…

So basically no matter how they structure the next electroshock therapy, the only thing you can depend on is:

  • Hopefully running through it without slipping (wear good shoes like I did).
  • Wearing more protective clothing (rubber, rash guards) to make the zaps much less painful.
  • And if you’re really worried, just not doing it at all for fear of health repercussions. 

Unless you’re a masochist and enjoy getting zapped, do one of those 3 things. I know there are people who love this kind of stuff but even if you’re fully health and prepared to run through it, I always have doubts about long term risks of getting zapped. 

I wouldn’t take the risk of doing it with less clothes or if you have one of the specified rules where they tell you that it’s not for you. Just protect yourself, get through it quickly and move onto the next thing (although after that obstacle, the race ends).

Knowing what I learned from that experienced has made me ready to take on the next Tough Mudder or any mud run with an electrical challenge knowing that I’ll be prepared (although I still have horrible post experiences from the MudmanX zaps).

There aren’t many obstacle courses other than those 2 that I know of which have an electric zapping challenge, but check your race before you go just to make sure. If they do, you already know how to prepare! And if you want to have a laugh beforehand, check out this video of other people doing electroshock therapy:

ec2

Battle of The GoPros. Hero 5 vs Hero 4 Black.

gopro hero 4 black vs hero 5 black
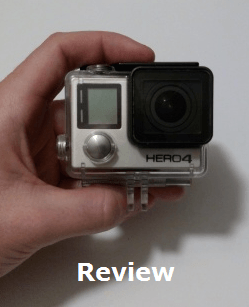
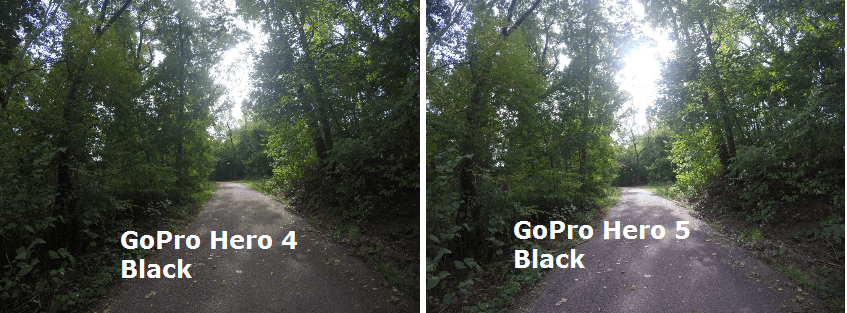
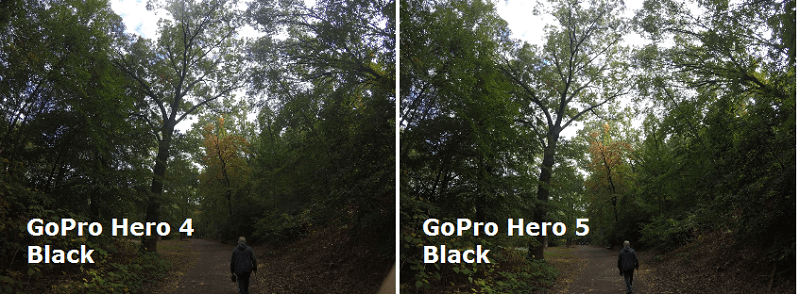
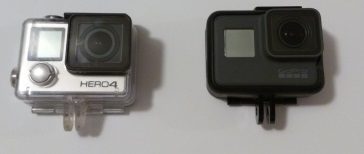
I really wish I had kept myself updated on the news that GoPro was going to be releasing the Hero 5, because a few weeks before it was released, I got myself the 4th one (black).

Although I was and am still very happy with it, I really though that I had the best one there was, then after hearing the new one was coming out and it was promising to be even better, I took awhile to think about it, but eventually bought it, mainly because I was immensely impressed with how well my first one performed on a mud run. 

Now that I have both, I though I’d do a “comprehensive” comparison. I’m not really going to go into numbers or every tiny detail each camera provides, but I will give you the major comparisons, such as how the video and picture quality compares, which perks are available more so on which camera and overall if whether or not, one is truly superior.

I have done a full review of the GoPro 4 before and I will take elements from that article to do the comparison here. 

The 5 ways we’ll be comparing the cameras: 

Picture quality. The winner is…

Both. I took a series of pictures with both cameras and have put them side by side. In rare circumstances, specifically when there is light, the Hero 5 captures it better, whereas in every other circumstance, both cameras pretty much produce the same exact finish: 

gopro hero 4 black vs hero 5 black photo comparison

You tell me where you in these pictures you can see a difference. Had I enhanced and make the overall pictures larger, sure you may spot a slight difference in the photos, but honestly, they are the same. Both have a 12 megapixel camera.

However, remember I said that thing about the lighting and the Hero 5 capturing it better? Here’s a specific side by side comparison where this is somewhat noticeable:

gp4vs52

Now I only noticed this specifically when it came to areas where there was more light. Every other instance, the photos are identical pretty much. Here is another example where an area with more sun is seen more so with the Hero 5, specifically the orange tree leaves in the middle of the photo:

gpff

I honestly do not think this slight difference makes one better, to me both cameras produce basically the same images. 

Video quality: Winner is…Both again. 

For those of you who have done prior research on the Hero 5, you may know that it has a feature in it that stabilizes the video when you’re shaking, jumping or moving around, preventing that from showing on the actual video and producing a much more smooth video. That is not part of this specific comparison, but it will be a perk I will mention shortly below.

All we’re looking at here is how the video image quality looks in both cameras, not the extras that go into making that quality and in that regard in my opinion, both cameras are equally great. I will try to set up some videos to show them right here, but basically the same kind of images you get from both, apply that to a video and you basically get the same exact result. 

Convenience: Winner is…without a doubt the Hero 5. 

g

What exactly makes this camera more convenient to the 4? A lot of things honestly and this is where we will cover the overwhelming majority of perks the Hero 5 has on the 4:

First obvious thing is the actual digital screen that it has. When I first turned on my Hero 5, I had a few basic set ups including the time and date to put up, but otherwise, the screen itself isn’t as responsible as say a smartphone screen, BUT having this available to you makes looking at images and videos right on the spot possible vs the other one where you would have to either wait until you got home and exported the files OR connected it to your phone and that would only work if you had Wifi (by the way, both cameras have it).

Voice recognition. This is another cool thing that I personally haven’t used it for, but it is NOT available on the other one. You can basically call out actions for the camera to activate to start filming/taking pictures. 

There is a cut/editing option available on the digital screen. Once you take pictures/videos and look them over, you can cut out clips. You can ALSO delete the media you don’t like right on the spot with this camera if you need to have extra space. Again with the other version, you can’t do this unless you export the files first and erase them of the SD card. 

There are also other editing options within the camera available that I really have not yet figured out.

1 button turn on feature. Say you are in the woods and something exciting happens, like maybe a baby dear shows up or you get chased by a bear (hopefully not). With this camera, you can start filming and have more chances of catching the moment FASTER because of the 1 button turn on and start recording feature:

rrw

With the other option, you can’t do that. If the camera is off, you have to hold the mode button for about 3 or more seconds before it begins, then activate the camera with the red button.  

There is one convenience I found on the 4 to be better suited for me: The area where you place the SD card is easier to insert/take out. On the 5, you have to place the SD card in the same area as the battery, but the thing is, you have to take the battery out if you want to take out or put the SD card in. I have tried to do it while the battery was inside and I couldn’t. This just makes it more annoying to take it out every time:

egegqe

I also didn’t like that the batteries and even the USB cable for both cameras were different. I find this a waste of money since now I’ll have to buy 2 different batteries if I ever want to have an extra pack and speaking of batteries, another convenience is that the Hero 5 appears to have a longer battery life, despite technically using up more media from what I saw.

Which is more durable? The winner is…the Gopro 4, as long as it has it’s case.

One thing which turned me off the Gopro 5 was that the default camera itself was somewhat exposed to getting broken or having the lens and screen cracked, despite it being a lot tougher than most screens. 

You see, the default case+camera you get with that one comes with a very minor protective case that only really covers the main outer layers, leaving the lens itself, the front screen which shows which feature is on and most importantly the digital screen open for possible damage.

However, it is also true that the same default bundle is also the one you can use to put underwater and take right away on your adventures:

ca

Now notice the little screw I put on the right case. I put that there to show there is no protection from this case, the screen is exposed and if it falls on a rock or crashes somewhere, that screen can crack. On the 4, there is TOTAL protection, thus giving it more durability.

Where would this durability come in handy? A mud run and this is VERY important:

I completed a mud run with a GoPro 4 and let me tell you, I am glad I didn’t take the other one with me. With all the dirt my camera had on it and everything that happened, I would not be surprised if the digital screen cracked or some dirt got in through the main case and affected the functions. 

Well then just buy a protective case right? Well true, but it’s a little bit tricky to get this right…

The price. The winner is…well both.

The 4 costs $449 usually (well the prices are changing ever since the new one came out but it’s more expensive) and other one is $399 (Get the newest GoPro).

However, if you consider the lack of durability and being able to take the Hero 5 through some tough adventures, you may want to get yourself a FULLY protective case for it which is about $30 or more, which if you do that, makes the price for both cameras pretty much the same!

Get the right case…

I actually recently ordered myself a FULL case because there is no way I am ever going to take my Hero 5 on an extreme adventure, like a mud run where I feel it’s going to be at risk of breaking and the problem is that with MANY cases I have seen designed for it basically look the same as the default case it comes with and that STILL leaves the same problem areas open.

Now the case I got actually covers everything, including the back screen which means I won’t be able to use the touch screen. It’s basically the Hero 4 case, but fitted for a 5 (and no, they are different so I can’t use one case on both cameras).

Update: Here’s what the case looks like:

Alright so I got the case and while I think it looks a bit “cheap”, it is a much better alternative than the default case you get. Couple of things: It is much bigger, but it can be worn on the same straps and be used the exact same way you’d use the normal case. 

h5c

One thing though, I was right about the back of the case not allowing you to be able to touch the screen so if you plan on using this case, be aware that you won’t be able to use the screen until you literally open it. Would I recommend this case? Only in extreme adventures…

Protect your camera fully if you’re going on mud runs, don’t risk going without it…

Considering that on something like a mud run, you’d most of the time keep the camera on your head or chest so you wouldn’t really have the luxury of looking at what you’re filming and even when you’re resting, trust me when I say your hands are going to be too dirty to handle the screen. Personally I wouldn’t want to get it dirty.

On extreme and risky outdoor activities, here is which camera you should take:

On a mud run or anything dangerous, I like the GoPro 4 because of it’s durability, BUT if you already got yourself the newest one, PLEASE make sure you get yourself a FULLY protected cover, then the durability question evens out for both cameras. 

So which camera is superior?m

In terms of comfort and convenience, the Hero 5 really is superior and I strongly recommend it if it’s your first Gopro. But if you already have a 4, unless you are a camera fanatic and have a spare another $400+ (camera + case), you’re fine with your current one. 

The main thing about both cameras is that they basically get the same end result in terms of quality pictures and videos, but the thing which sets them apart is that the Hero 5 can get you the same end result a little bit faster with it’s conveniences. 

Overall, you can buy one, or both, either way you will be happy with them. I am loving my cameras and am happy I decided to try them both instead of sticking to just one. 

g2

Let me also say that for the next mud runs I did, I still took my Hero 4 Black with me and was perfectly happy with the video and photos I took. Because I had already invested in 3 batteries for it and only 2 for the Hero 5 Black, I decided it was safer to take the 4th one with me and considering how the photos were the same (and in my opinion, so were the videos), I can’t really say the 5th version is that much better.

Tips on Getting Through Tough Mudder’s Cage Crawl And Rain Man.

One of the most uncomfortable obstacles I personally had to endure in Tough Mudder was the cage crawl, or more specially, it’s harder version: Rain man.

Prior to doing it, I had researched it a little bit in hopes of preparing the right way for it.

What is the difference between the cage crawl and rain man?

The cage crawl has you submerged in water with a fence over you. Only the front part of your face is above the water, leaving about a few inches at most for you to breath.

Then there’s rain man…the more advanced one for the “legionnaires”, one of the more “exciting” experiences in Tough Mudder.

tough mudder cage crawl photo

It is the exact same obstacle with one thing added in:

Water is pouring over you in several areas as you drag yourself across the obstacle face up. I believe in my challenge it was 3 areas where water was pouring.

Does this one little addition to the obstacle make a big difference? YES.

In fact, if you don’t know how to handle this challenge, you may start panicking once the water hits your face and it may make you feel as though you’re drowning. That’s how I felt when I went through it.

Luckily, this wasn’t the first time I had this uncomfortable swimming experience so I was able to cross it, but it wasn’t pleasant and I will share tips with you on how to beat it.

Tips on getting through the cage crawl:

Know that it’s not deep! The cage crawl is honestly not scary at all. The water level is about 3-4 feet deep, but it iscc 
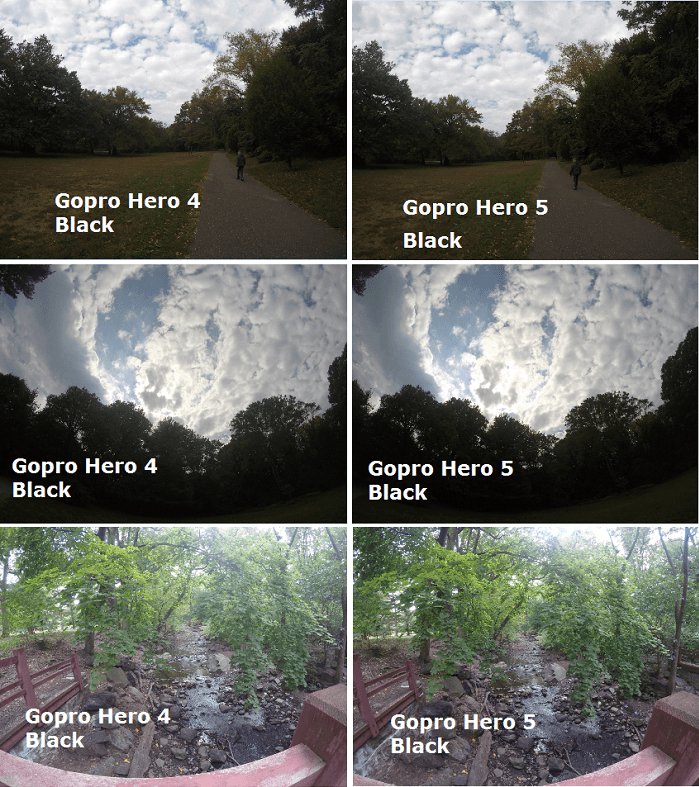
dirty and it can make you feel scared.

Your job is to crawl using your hands, but have your head be in front. My uncle did this challenge and basically tried pushing himself feet first. This was a mistake as it caused the water to basically push against his face. I yelled at him to turn around and he heard me halfway, did it and it became much easier for him to move.

You don’t need good grip to move along the fence, just a steady pace. Your body is floating the whole way so all your hands are doing is just moving it along the water. You don’t need too much strength for that especially once you start moving, it’s going to be a motion that will only keep increasing as long as your hands keep pushing your body to the end.

Tips on getting through rain man:

Apply all the same tips from cage crawl, but add this in:

Hold your breath when you reach the areas where the water pours on your face. Do NOT try to breath in these areas, it’s almost impossible and you’re going to feel as though you’re drowning. This is the moment where you’ll feel that panic attack. If you hold your breath when the water hits you, know you will only need to hold it for about 5 seconds or when you stop feeling the water hitting your face. When that happens, resume breathing.

Focus on the motion of your hands to be constantly moving along the fence and when the water hits, ignore it, focus on holding your breath and continuing to move. A lot of people underestimate what it’s like to be looking up and having water being splashed at you. It’s a very deceptively scary experience which is why you need to train yourself to be mentally ready to overcome it.

The entire obstacle takes about 15-30 seconds to cross. Just know that it’s very short and there’s always someone available for safety if you need help.

cc12

“Fortunately” I had a much scarier experience that helped me prepare for rain man:

So the scariest thing without a doubt is the water splashing your face making you feel like you’re drowning, but of all the things that I could have experienced that through, be it stormy seas, big waves, waterfalls, I experienced that sensation for the first time in my life in a water park.

While going into a looping tube that was very narrow, completely dark and very high up, I was asked to remove my shirt put it between my hands, cross them as well and head in to avoid friction in the tunnel and getting stuck. 

So I went in without even expecting what would happen and then it did. Throughout the entire tube ride down, through the looping areas, there was a lot of splashing happening and a lot of water flying in my face over and over. 

That was the first time I experienced that drowning feeling because every time I tried to take a breath, more water would splash at me, breaking my breath and causing me to lose it. The entire ride felt much longer as a result and I would say it lasted about 20 seconds, but it was absolute torture and I was completely out of breath when I came out of the tunnel. 

That horrible experience actually prepared me very well for rain man because after the tube incident happened, I learned that in that moment, I had to do 2 things: Hold my breath and cover my face with my hands so there would be room to breath without water coming in. 

I had similar experiences later (before Tough Mudder) where I tested this out and it ended up working, but a big factor was mentally gauging myself when it would happen so I would get scared. 

So when you do cage crawl or rain man, know that while cage crawl is easy compared to the other, if you do rain man, remember that tip about holding your breath and keeping control. 

Overall, this obstacle isn’t that difficult, it just tests you mentally so if you know about these precautions, you should be fine. And on race day, if you’re still not feeling that you can take on rain man, do cage crawl instead.

In some cases, people who can’t do either because they’re worried about swimming or not comfortable can avoid this obstacle. No one is going to force you to do obstacles in Tough Mudder.

I’ll say this, Tough Mudder has some truly creative obstacles, ones that I didn’t see in other events like the Spartan Race, but before you do an event near you, ALWAYS research the obstacles.

c23

3 Great Mud Runs Specifically Made For Kids!

Generally most mud runs are for adults, but there are courses specifically designed for kids.

There are far more than 3, but the following ones are more popular across the country so you’ll have an easier time a local event and there will also be a lot more people.

1: The Spartan Race for kids.

Also called the Junior Spartan. This event actually has 3 different divisions, all beginning from age 4 up to age 14. Race length ranges from a half mile to 2 mile courses.

As for obstacles, generally they are the same copy of the adult courses, but in a much small, safer and easier design so they can be crossed.

  • For example, where as adults need to cross under barbed wire, kids will just have a rope over them.
  • For most walls and muddy areas, they are slanted so there’s less chances of a fall.
  • However, most strength tested obstacles are similar for kids, especially in the monkey bar department.

2: Fruit Shoot Mini Mudder!

An obstacle course held by Tough Mudder but designed for children. Although the Spartan Race had several divisions, this one only has 1. It is a mile long and also copies many of the obstacles you see in the adult course, specifically tubes, the mud mile, devil’s beard, and climbing challenges. Learn more about Fruit Shoot Mini Mudder.

Again, the design and choice of the obstacles is meant for safety even there is climbing involved and they fall, they don’t usually fall hard or from a high area, so it’s safer.

3: Down and Dirty Obstacle Race.

This is also another adult run that has a kids race. Although it is much less popular than the other 2 races, it has 2 divisions, one of which is also a mile long and features obstacles where you do things you’d see in military and football training like tire hopping.

Overall, if your child is at the right age, is active and has a good physical level of training, these 3 choices would be very fun for them to try.

Recommendations to keep them safe:

While the challenges in these races and most other mud runs are WAY safer than for adults, it still helps to train and dress them up in a way that improves their safety.

Just like for adults, the same things I recommend wearing for them, I also recommend for kids as well, specifically the shoes, and pads for elbows/knees. 

Now for shoes, the one I recommend most is the Salomon Speed Cross, but the smallest size they have is and 8. There is another good shoe that is also good for these events that has sizes as low as 5, it is called the Inov-8 MudClaw.

You can also have them wear just regular trail hiking shoes and it’ll probably be fine since these races aren’t as intense. But remember, good shoes help prevent sprains. 

If it’s warm outside and they aren’t wearing a fully covered shirt, have them get sun block just in case.

Always have your kids do a lot of practice before these races in your backyard or on the playground. If they actively play outside, climb monkey bars easily, they’ll have no problems getting through these courses.

Stretching and making sure they are flexible is also another key. Although kids are generally a lot less likely to get sprains and injuries, it is always better to have them be prepared when run these courses. 

Remember, some of them are as much as a mile long and with the Spartan, it’s 2 miles for older ones, so they should at least be used to running that kind of distance so they aren’t surprised or taken aback by it. 

Also let them know that it’s never a good idea to race with others unless they are experienced. Children can easily get into a competition with others and start trying to blaze through the course which can have them trip or run into others. Teach them to go at their own pace and be careful not to bump into the others. 

Should your child be the only one to participate?

I would not recommend that your child be the only one to go on these races. They aren’t very long, but most destinations to these events take a long time for people to reach. For me, when I travel to them, it takes me about 2 hours to reach and that’s just one way. 

Traveling for an hour or two to then wait to register them and them have them finish quickly to drive back home just as long would really be a waste so you may want to also participate in an adult race while they do the other one and have someone chaperone them, that way you can all have fun.

Can injuries happen even though these races are much safer? 

Of course when you’re running on obstacles, in mud where you can’t see the bottom or you’re unprepared, it can increase the risk. But keep in mind that these obstacles are mainly designed to be much easier and focus a lot on the safety. Again most kids have a lot of fun in these courses, it challenges them and it helps them eventually get ready for the adult ones.

If you’re concerned that your child may get injured, like I said, have them wear the right gear and train for it. These races really aren’t that difficult and even those who are about average on the physical level can do it. 

Keep in mind that you can also select levels available in some events. Pick one that suits your child’s age and abilities. If you’re still worried, have them run outdoors to see how they do before they enter these things. 

If you are planning on going with other friends and want your child to come along, they don’t necessarily have to also participate, they can also watch you and others and see if they want to try them in the future. 

The price for kids to enter these races is MUCH cheaper than for adults. Have them go if you’re going too, you’ll all enjoy it! And it’s a great way to prepare them for the mud runs out there designed for adults.

GoPro Hero 4 Black Review. I Can’t Believe it Works After What I Did.

gopro hero 4 black reviewIn anticipation of a Tough Mudder race I recently did, I decided to invest in a GoPro, specifically the Hero 4 Black and man, I put this thing through some extreme tests I though for sure would either somewhat damage the camera or even make it malfunction.

It wasn’t even on purpose, it was just that the environment I was testing it in was so extreme, that I felt that even this thing, regardless of it’s reputation would be damaged.

Well it wasn’t. It’s still perfectly fine, as is the case it was in and it’s ready to be used anytime on my next adventure. So I wanted to share in this review what happened with this camera, the place I took it to and the things it went through.

Now in terms of understanding it’s functions, it’s stats, abilities, ect…, my technological knowledge is limited. I am not a professional photographer who can document specific stats of a camera, it’s lens, it’s abilities, ect…

All I really know is that a higher megapixel = good and overall, all I wanted to get out of the GoPro was a memorable experience of a fun activity I did and it gave me that and more.

And in terms of experience, this was the first time I had ever used a GoPro.

Alright, so let’s point out a few things about the Gopro Hero 4 Black:

gh5

  • The price of this thing is about $140 (We are talking about the Hero 4 Black specifically).

1

  • It comes in a plastic, water proof case. This case in spite of being extremely good at protecting the Gopro itself is surprisingly good at letting sounds pass through. I honestly, though my voice would be muffled, but it wasn’t, you can clearly hear everything when you export videos to a computer.
  • On the camera itself, there are 2 “doors”. Door 1 is on the side, which when removed opens the access to put in your SD card (By the way, the best SD card for Gopros based on what best buy employees gave me is this one, a Sandisk extreme, and the limit for a Gopro is 64GB).
  • Door 2 is at the bottom and opens the area to put the battery in.
  • Now in terms of buttons, there are 3:
  • A record button at the top, a mode button on the front of the camera which switches the mode from video, to pictures to multi shot option and finally a settings button on the side which I didn’t figure out. To me having a high megapixel number and and high quality video was enough.
  • I also know there is wifi and bluetooth access. My friend who helped me set it up showed how you can install an app from the Gopro site, connect it to the camera can handle the recording from your phone. It’s basically like having a digital screen, but on another device. Since the Hero 4 Black doesn’t have it, this option makes it possible.

4

So what was so extreme that I put this thing through?

Well if you didn’t know, Tough Mudder is a dirty, long and muddy obstacle race where a lot of people actually like to take their Gopros on. I actually did see a number of people like me wearing them on their heads.

But when it comes to extreme, if you really put yourself through the entire course, the camera and the case are going to take a beating. You’re going to:

  • Fall in water.
  • Crash into mud.
  • Smash into walls.
  • Possibly drop the camera several times like I did.
  • It WILL be underwater.
  • It will be extremely dirty.
  • And in my case, it was so dirty that when I had to switch batteries, a lot of mud got onto the actual camera (I did have to open it up from the case to switch it).

This is certainly a lot more than you see people put this thing through on YouTube videos so you can bet that on the day I tested it, I tested it to the extreme. I do have a YouTube channel which showcases my mud run videos, all of which were recorded with a GoPro Hero 4 Black. Here is one example:

I’ve still got a few areas where there’s dirt left over on the camera, but the quality has not been affected. There’s really no damage…

It’s working just fine, it’s ready to be used again and there’s not a scratch on it. This thing can take a beating and still be perfectly fine which is shocking to me considering how much I went through with it. I was on the Tough Mudder course for at least 5 hours straight.

2

Pictures we took on the Gopro 4:

gopro hero 4 black photos mud runs

The picture quality is pretty amazing. I tried to add the images to showcase things like the details in the mud, the drop of water, the color distinction and in one photo, it looked cloudy because the outer case was covered in dirt and we were cleaning it throughout the race, but because we were also very dirty, we could never get it to be completely clean, yet despite that, the picture quality is still amazing. Here’s some more:

gp11

I took a special photo of a park walk I did recently just to break the muddy picture vibe! But otherwise, as you can see just about every detail is caught. Even though it’s a 12 megapixel camera, I honestly think it shoots better than my smartphone. 

3

Tips to prevent you from losing this expensive toy!

After realizing just how durable this thing is, I’m sure it can handle any extreme environment, what worries me more is losing it. In the case of mud runs, these things happen often and I did have that problem.

What I learned is that if you’re going to enter some sort of environment where you’re going to be underwater or you’re not sure if the strap that you have will hold tight, be safe and give the camera to someone to film you from a distance.

In my example, I gave it to a few other team mates while I had to pass through obstacles where I was hanging above water. If it fell in there, I would not be able to find it, so to be safe, I just gave it to someone I trust.

Are you saying the straps people use are bad?sm

No they are actually quite comfortable and keep the camera on tight. Running with these is also fine, not noticeable and I would get them if you can, but sometimes you jump very high or you roll on the ground and do things that can affect the tightness of the strap.

If you expect this to happen, always keep an eye on your Gopro at all times and like I said, just be safe and give it to someone to record you. 

Pros: 

  • I was able to take some very high quality videos and pictures on this thing.
  • Extremely durable camera and in the case, it can take pretty much any harsh condition/environment. 
  • Fantastic tool to record adventures and especially mud runs.
  • Very easy button system. Press to change the mode, then record it or take pictures basically, that’s all it does.
  • Easy to activate it while you are moving. 
  • Easy to export the recorded files to your computer (plug it in to the USB and hit the mode button to export).
  • Very easy to clean after use (the case mainly, the camera is too).
  • Additional accessories such as chest/head strap are easy to put on and hold the camera pretty firmly.
  • Because you can maintain mobility with this thing and film it at the same time. 
  • This thing weight less than a pound. 

Cons:

  • There maybe a risk of losing it in certain conditions. Use the safety tips I recommended to prevent that. 

Overall position on the Gopro Hero 4 Black:

I absolutely love this camera despite only really using it twice, but with all that it went through, what would surely destroy other cameras and/or damage them, the durability on this thing showed me why Gopro has such a good reputation and why people who do serious stuff outdoors prefer it.

5

This review doesn’t do the Gopro Hero 4 Black justice:

I know I still have so much to learn to use this thing for and settings and features I’ll probably never figure out, but let me tell you, for any outdoor activity where you expect electronics to get damaged or at least be at risk of it like in my mud run, you’re going to need something like this that is proven to take the challenge.

For something so small, it can withstand so much damage and deliver amazing memories. This thing is coming with me on any adventure I do. I am very happy with my Hero 4 Black and recommend it to anyone.

I cannot wait to test this thing out on the next mud run I do (The Spartan Race!).

Update: Well, the GoPro series is up to the Hero 7 Black now…

I briefly used it and have to say that for me, the Hero 4 Black is better because the battery life is LONGER. You will find the image quality isn’t that big and if you liked the videos/photos I put above, then you’ll be happy with a cheaper 4 version than the 7.