Survival Race Review. It’s Not Challenging For Fit People.

survival race review photo finish

The Survival Race was my second official mud run I completed. My review of the event is that it’s fun, but if you seek to challenge yourself, there’s better events to try.

You see before I did this event, I had completed another called Mud Man X which I have to say was equally as “difficult” but more fun with the challenges. I was invited to try the Survival Race by my uncle and both he and I were looking to challenge ourselves, so a name like the “Survival Race” seemed appropriate.

At the time however, we didn’t know about the true challenging mud runs like the Spartan Races and Tough Mudder (we did try those a few years later).

Info about the Survival Race:

The Survival Race is only 5K miles and good for beginners. There are “waves” of races that take place every 30 minutes where new registrants begin the trail. Our wave was at 11:30 a.m.

On our team, we had a man who was also interested in testing himself on the course, and since I wanted to as well, the rest just wanted to take their time, so he and I decided to run ahead to see how fast we could finish the race. We were doing very well and had no difficulty bypassing the obstacles which were muddy areas, running circles around trees, a sand mound and puddles, that’s how easy it was.

We were making great time and at our pace, we could have finished the race in under an hour. Unfortunately, about halfway, we hit a long line which was formed because people had to wait to pass 1 obstacle. And the people behind had to wait in line to try it out.

This was the worst part of the race because people who are anxious to get ahead wouldn’t be able to because the course was so narrow and you’re weren’t allowed to “cut in line” so those who are more physically fit ended up having to wait behind people who weren’t.

You may be thinking that if waves start every 30 minutes, that the faster people will just get ahead but the line that we had to wait in had people in waves that were before us (11:00 a.m. and even 10:30 a.m.!). That meant there were people that were stuck in that line for almost an hour.

Any person who was ahead of their wave’s participants by 15-30 minutes ended up still meeting up because of that one obstacles. So what was this obstacle that was causing the delays?

It was just a simple board…

It was about 3-4 feet high. All you had to do was run to it and use the speed of your run to climb it and then go over the other side which was also a board so it’s not like you were jumping on the other side. There really wasn’t anything to be scared of yet people instead of getting a running start to get through it were so scared that they would run up to it, stop, then try to climb it. Many were slipping because so many that were going over it had wet shoes so they left water on the board so most people that couldn’t complete it had to restart.

But they would restart immediately and were given as many chances as they wanted to pass it instead of going behind the line and giving the more physically fit a shot and that only made the line longer and longer. My team and I waited for over an hour before our turn came up.

This was very frustrating for my team and it really made the Survival Race a big disappointment. I understand that these events have people with different physical levels, but this course was set up so narrowly that there’s were very few areas where you could go around people that are slower than you.

Finally the “race” continued…

The same person who I went with ahead of my team early on in the race wanted to make up for the crazy amount of time we lost on that “obstacle” so we basically ended up fast jogging through the rest of the course. One kilometer of this involved us just going through basic wood areas, with some of them having mud.

However, in these areas, there weren’t many boundaries keeping us enclosed in the course, so I ended up running around any areas with mud because I just didn’t want to get more dirty. My companion however, didn’t care and just ran through it.

The last part of the Survival Race…

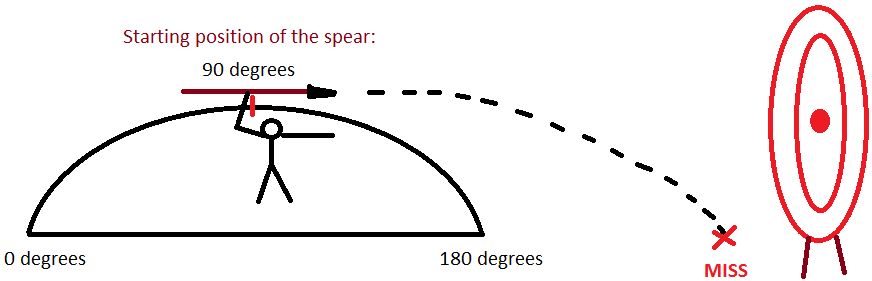
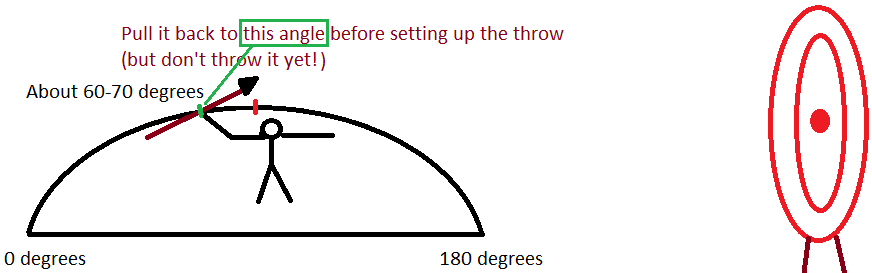
Once the woods ended, a huge open field was before us and it would be the last kilometer of the Survival Race. Here we would need to go through 4 final obstacles:

1) A simple board about 4 feet high with a large hold in it. You just had to jump through it. 

2) A flat area where you have to carry some stuff for about 100 feet back n forth once, very similar to the Spartan Race, except it was much easier here.

3) A rope swing. 

4) The last part was just a run through very thick mud which was also slippery. They put that there to make sure we were dirtied up as much as possible before the finish line…

survival race review

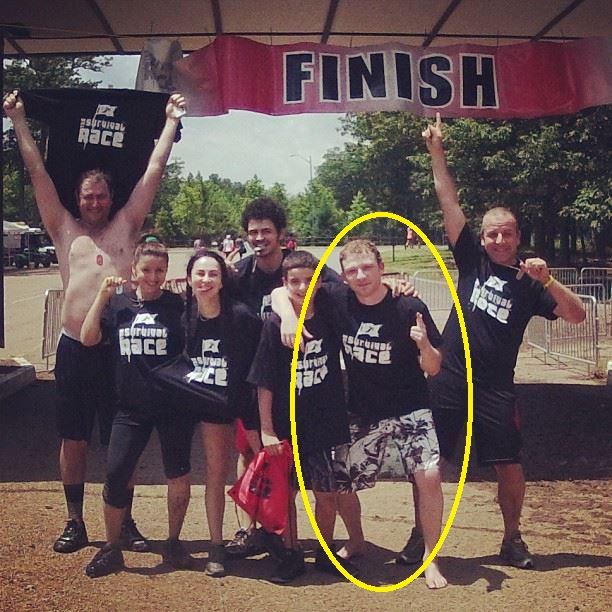
We all enjoyed the Survival Run and for some of us, it wasn’t easy to do, but for myself and the gentlemen I was sprinting it through with, the only thing that made it difficult was the actual sprint, otherwise it was very simple to complete. 

Like Mud Man X, this race was designed to people who are new to mud runs in general and if you’re in average shape, start with that one or the Survival Race. If you get too tired after finishing it, then this level is fine for you and you and if you find it easy, upgrade the 5K Spartan Race, then the other more advanced, longer courses!

Here is a list of mud runs and their difficulty levels. And finally, have you tried the Survival Race or other similar runs?

5 Real Dangers of Mud Runs And How to Prevent Them.

As fun as mud runs can be, there is also a big reason why they all have you sign consent forms: There are 5 very real dangers in all of themmud run dangers and injuries and the more advanced the race, the more likely one of them can happen. 

I actually had 1 major one on a Tough Mudder I did in 2017 and will explain that accident plus the other common dangers these events pose.

But many of these risks are preventable! 

1) Exhaustion/Dehydration: 

People who are are in decent shape who have never ran through a mud run before will find this problem hits pretty quick and it can happen during ANY season the race takes place. Here are ways to prevent yourself from being exhausted and dehydrated:

  • Take frequent breaks when you’re on the course, especially when you’re a beginner to mud runs.
  • If you’re doing one of these events when it’s hot and sunny, try to wear a hat and pick areas to run through where there’s shade or when you take a break, sit in a nearby shade.

2) Diseases.

There is a huge danger of diseases on mud runs.

Imagine running through dirty water with an open wound or scratch. Then think about all the people before you who ran through there who may have also had that.  Then that’s mixed in with the water you’re now running through. You can catch different diseases that can cause diarrhea, sickness and skin infections. To prevent those problems:

  • Don’t ever drink or swallow any of the dirty water. Only drink clean water at water stations or from your hydration pack! Should you accidentally get any of this in your mouth, use clean water to get it out. Keep hydrogen peroxide in your hydration pack and rubbing alcohol pads or a bottle just in case.
  • You’re going to have to have a strong immune system! You may not always be able to avoid getting scratched, but if you have a strong immune system (drink vitamin C, ginger tea if possible and eat garlic!), any dangerous dirt that touches your skin or potential diseases won’t be as likely to hurt you if your immune system is strong. 

3) Injuries (slips, falls).

Other than diseases and exhaustion (dehydration included), injury is the most likely thing that can happen on mud runs if you’re not careful. Sprained joints/muscles, any typical injuries or serious ones are all possible. This is what happened to me on the Tough Mudder I did.

  • Before any mud run, warm up your body and make sure you stretch it well! Also make sure to do it several times during the race. You are going to get tired throughout the course, especially on very long ones like the Spartan Super and your muscles will stiffen up so keep stretching them on breaks. 
  • Wear trail running sneakers! The most common injuries happen on these events when people don’t wear the right shoes. Slipping on the dirt AND the obstacles is very common and these can easily lead to sprained ankles or worse. Trail running sneakers like these can help you maintain a good balance in the most dangerous areas and if you also add in socks that are safe for mud runs, you’re going to have less injuries.

4) Losing expensive equipment like cameras!

There are many people who go through these events with things like GoPro cameras that are attached to their head and chest. Most of the time, the equipment that’s meant to hold these cameras works, but on mud runs, there are times where you can fall on the ground and break it or lose it if you’re going underwater. 

I actually had this happen on the first 5K Spartan Race I did where I had to dive underneath dirty water while with a camera on top of my head. When I came out, it was gone! Luckily the strap that was attached to my head which also fell of caught onto my foot, but if it didn’t, it would have been very difficult to find it because it’s impossible to see anything in that water! 

  • If you’re diving underwater while keeping this camera, I really recommend you take it off and either hold on to it as well as tie the strap onto your hand or put it in a backpack. 
  • If you’re going through an obstacle where it can fall of, pay attention to your safety first. If it falls of, remember where it fell and then when you finish the obstacle, then go and pick it up.

I even remember an obstacle on a Tough Mudder I did where I was waiting in line to complete an obstacle that involved falling into water and the person in front of me was recording himself on his GoPro giving his email and address in case he lost his.

5) Death in a mud run. Can it actually happen?

I have only heard of 1 case where someone died on a mud run and it was on a very advanced course and those places are where the biggest risk is. You may be climbing a large obstacle and fall or you may slip the wrong way. Unfortunately there is a risk of this happening if you’re not careful, but you shouldn’t let this freak you out:

  • Typically the biggest risks are at obstacles but every obstacle has supervisors standing by just in case someone needs help.
  • Risks of injuries and even death are more likely to happen when people aren’t properly prepared. When you’re going through dangerous obstacles, make sure to take your time. The worst injuries happen to people who aren’t flexible or try to rush through obstacles. If it rains, expect the course to get a lot more dangerous. In that case, be even slower on every obstacle and even during the regular course. Avoid stepping on rocks especially when it’s wet!
  • Wear protective gear like elbow and knee pads. While they don’t protect your whole body, if you fall from a height, these joints take the most damage. 
  • Do regular races (MudmanX) that don’t have dangerous obstacles like the Spartan Race or Tough Mudder if you’re very worried about injury. There’s very small risks there.

All these races have dangers in them.

Even advanced and experienced athletes can get injured. From doing many of these races, I have found that the safest way to prevent them isn’t just to stretch and hydrate, but to also be slow. Rushing in these races is very risky.

The faster you go through the courses means the less likely you can see where you’re stepping or jumping and a lot of the more experienced athletes actually make that mistake. Try not to make a certain time on these courses, but instead try to have fun while making sure you pass the course without any injuries! 

How to Climb The Rope in The Spartan Race.

how to climb the rope in the spartan race

The rope climbing obstacle in the Spartan Race is one of the most difficult, one I’ve seen some of the strongest people fail at in these events, including myself.

Unfortunately, there’s nothing regular about this obstacle. Not only do you have to have crazy upper body strength to climb it, but here are:

4 very real risks you have to conquer to beat the rope climb in the Spartan Race:

  • Risk 1: There’s also cold and very, very dirty water you have to enter. 
  • Risk 2: It’s also incredibly wet because throughout the day, with the different waves of people passing through it, a lot of them fall into that water, then try to re-climb it, falling again, but the way the rope is designed, it almost absorbs all that water, making it constantly slippery.
  • Risk 3: This obstacle isn’t the first one on the course. Chances are you’ll run into it around mid way or close to end of the race by which time, you’re exhausted from the other parts of the race.
  • Risk 4: And of course there’s also the danger of falling from a large height, something which I have witnessed and depending on how you can reach it, if you slip, obviously you can fall very fall. Some Spartan Races like the Beast I ran, have begun to use mats instead of water to soften falls, but it’s still dangerous.

That slipperiness plus the grip strength you need and the exhaustion you’ll accumulate are all going to make this a very tough challenge so if you want to beat it, you have to be ready to face those 4 things and that’s how you’re going to beat this challenge! 

Mastering the climb and reducing the risk of injury: 

Risk 1’s solution: 

The cold, dirty water isn’t really a problem if you’re doing a Spartan Race in the Spring or Summer because in those seasons, when you get to it, you’re going to be overheated and sweaty so entering anything cold will feel great despite is being super dirty.

The only risky thing is catching a cold if you’re doing it in the cold seasons or catching some sort of infection if you’re cut. To avoid that, you need to try and not be cut during the race but that’s VERY hard considering how difficult the Spartan Race is. So to beat this risk:

  • Make sure you’re carrying supplies in something like a hydration pack that are anti-septic so when you finish this obstacle, if you have a cut, you can quickly reduce any risk of infection. 
  • Wear gear that protects your skin! More protective gear means less chances your skin gets cut! See the best protective gear you need to wear for the race!

Risk 2 solution: Tips on how to actually climb the rope! 

  • You won’t be able to avoid the slippery rope problem so you need to be ready to beat it:
  • Learn to climb a regular rope at a local gym. Every obstacle you do in the race should be prepped for beforehand. If you don’t have any of these at your gym, practice ANY upper body exercises, especially pull ups!
  • When actually doing it, make sure your elbows are tucked in. Many people climb it with their elbows out, looking as though they are some kind of fitness model posing. This puts tremendous strain on your elbows! You can really injure them doing this so tuck them in, when you practice and when you’re doing it on race day.
  • For beginners, use your feet to give your hands a break. Even advanced people are going to get tired from just using their hands. Your feet will provide an extra “lift” when you try it.
  • Since it will be slippery, you should get a pair of gloves that will help maintain your grip (grab excellent gloves especially designed for mud runs!). When practicing this outside the race, learn to climb it without gloves so you improve your grip strength! 
  • The J HOOK will save you…

How to do the J Hook when you climb the rope (I will include real pictures soon):

how to climb the rope in the spartan race

  • Begin by holding onto the rope with your hands as high as you can so when you let your feet go, your body will be slightly hanging off the ground.
  • Then take one of your feet, move it behind the other, and then swing it underneath it. So if my right foot and put it behind the left, that right foot would also swing underneath the left. 
  • That same right foot that swings underneath has to also grab the rope and tuck it above the left foot. 
  • Then take the right foot that’s holding the rope and tuck it between it and the left one. Now it’ll be tucked in place and all the weight is on your left foot.
  • This is the J hook and when you have this position, you can ease up on the pressure on your hands, giving them a rest.
  • Then, when you’re ready, let go of the J hook, and pull yourself up higher, then secure the J hook again. Every J hook is like a checkpoint until you reach the top and even when you go down.
  • All you’re doing with this J hook is each time you get higher and higher on the rope and get tired, this technique helps your body and hands relax before you’re ready to keep going.
  • Practice the J hook at the gym if possible to see how it feels when you have it secured correctly. Then you can feel out how much grip you can ease up on so you can do it during the race.

The J hook isn’t as easy to secure on a wet rope vs a dry one, so be ready to depend on your grip strength while you try securing it. My uncle had that issue on the Spartan Race where he tried to get it, but couldn’t because his foot kept slipping. You need to keep calm if you slip and patiently try to re-secure it.

Risk 3 Solution:

Since you will probably be tired when you reach this obstacle, the best thing to do is make sure you relax your shoulders when you’re not going through obstacles that require that upper body to work as well as your hands.

If you are tired when you get to this challenge, you should relax for a few minutes, stretch out your hands, feet, and shoulders before going through it.

Risk 4 Solution:

The best prevention from falling of this challenge is really having a secure, strong and long grip (with gloves) and keeping it secure with the added J Hook in place. 

If you do fall, the depth of the water isn’t that deep so make sure you fall with your feet first and when you land bend them and fall backwards or forwards. That will depend on where the momentum pushes you. If it pushes you forward, go forward, if it pushes you backwards, fall backwards and you will be fully submerged in the dirty water!

If you’re doing this obstacle completely vertically, this is how you’ll fall if you lose your grip. I have seen people do this challenge upside down and sideways. It is very risky. If they fall at that kind of angle, they can hurt their backs. Fall vertically and feet first if it happens and don’t forget to bend your legs! 

Note: Sometimes the rope can be dry and hard to hold on to as well.

With the last mud run I did, which was the Spartan Beast, I had a very difficult time climbing the rope. I had expected it to be slippery and in the water, but was met with a surprise:

It was the last obstacle on my event, but it was in a totally dry environment with mats. Not only that, but the actual rope wasn’t wet at all. Instead it was dry but felt as though powder was covering it. And it was nearly impossible to hang onto it. MOST of the people who were trying to climb it fell. 

Grip strength is definitely the #1 thing you need to train for the rope climb, but I would also add you need reps on obstacles like this before the race begins to get used to the feeling of what it’s like to hang onto the rope. It’ll mentally prepare you, which I did not do, and this was why I did not complete this obstacle.

How to Throw a Spear For The Spartan Race.

how to throw a spear for the spartan race

I’ve successfully completed the spear throwing obstacle in the Spartan Race twice and would like to share the technique I used to do it.

You may not be able to become the perfect spear thrower overnight, but these tips will definitely make your technique much better and I encourage that you practice the actual throw (which I’ll show you) so you can become better at it.

Update: Finally have some great pictures up to show how to throw the Spear for the Spartan Race.

Before I explain the technique I used to succeed on this obstacle in the Spartan Race, I want to give a very basic tip that has nothing to do with the actual throw, but rather the mindset when you encounter it.

1) Be patient when you do the Spear obstacle on the day of the race:

The spear throwing obstacle itself isn’t going to be your first challenge but by the time you get to it (if you do), you’re going to be tired and probably irritated. You’re going to also be very impatient when you’re waiting in line to try it and when you’re up, you’re also going to try and finish it quickly.

Most people fail this challenge in the Spartan Race not just because they lack technique, but also because of impatience. When it’s your turn to try it, walk up, pick it up, get comfortable holding the spear and take your time before you throw it. The people behind you can wait and rest and you can do it too if you’re waiting for your turn!

The art of using this weapon is being able to concentrate and relax. It doesn’t take a lot of energy to use it and hit the target and it only weights about 4 pounds.

Note: The distance to hit the target is about 15-20 feet. 

2) Here’s my technique for throwing the spear…

Do you remember making paper airplanes and flying them? Well that’s actually how I throw a spear, except you pull your hand back a little bit more and use more energy to LAUNCH the weapon (the pictures will show this).

My first spear challenge happened on my second Spartan Race and I did it very successfully because I automatically assumed it was like launching a paper airplane. Other people were just tossing it at their target and that’s not how you’re supposed to wield this weapon.

If you don’t know how to use paper airplanes or use this idea for the weapon, then here’s another:

  • Your body’s position when throwing the weapon must angled diagonally with your power arm behind.
  • I am a lefty, so when I did this challenge, my left foot was behind my right and I held the weapon with my left hand as well.
  • My feet were positioned about 2 feet away from each other. Make sure you have a good distance between your feet.
  • Now you’re ready to launch the weapon.

The power and precision of the throw comes from:

  • The whipping motion of the hand and aiming the tip of the spear at the target.
  • Pivoting your body and back foot when you’re ready to toss it. Think of the same paper airplane or when you toss a baseball.

3 steps to setting up the perfect spear throw for the Spartan Race:

1) The hard part is getting your hand used to letting go of the weapon at the right moment when you do launch it. Before you begin, position yourself like this:

st

Basically it should be right above you, in your power hand.

2) However if you launch it from that position (90 degrees), it’s going to miss. That’s what the black dashes are.

Instead you have to pull the angle of the spear back a little bit more so when you launch it, you will get more distance to set up the power and it will also get more distance in the throw:

st2

Ok now a REAL life view of it:

how to throw a spear for the spartan race

Notice how just like in the illustration image, I am pointing the spear at an angle.

However, this is still not the position where you’re going to launch it yet! If you do it from there, it’s going to still miss and land hitting the back (the stick end). This is actually the same angle most people do this challenge from and fail.

You’re not going to throw it from there, but you are going to set up from there.

3) Now THIS is the position where you launch it. After you started at 90 degrees, angled it back a little bit to set up power, you are going to WHIP it back close to the starting point and let it go:

Your hand has to let go of the weapon right before it gets to 90 degrees otherwise, it’ll miss.

  • The hard part is letting go after you set up the launch like this. Many people go beyond the 90 degree angle before they let go and the spear ends up hitting the dirt before it hits the target.
  • Letting it go too early (under 90 degrees) makes it hit the dirt and land on the other end.
  • Your hand and the tip of the spear are the guide. Your hand sets up the tip and the tip then carries the rest of the weapon to the target.

Practice the motion before the race:

  • This tutorial is not going to be enough for you to become the perfect tosser.
  • No YouTube video on tossing them is going to do it.

You have to go out and practice it before race day. You don’t want to end up at this challenge and try to remember everything you read and saw. The best way to do it is to practice it so your body remembers how it feels.

Find a backyard, a park, any area where you have some space and practice the throw.

Practice it with a stick and use one tip of it as though it’s the actual tool. If it hits your target right at that point and in a straight line into the target, you made a good hit. If you didn’t or the angle was pointed too far in different directions (not straight), re-practice it. 

Remember to be patient with each turn you take doing it and make sure to remember how the whipping motion feels: When you set it up, when you pull it back and whip it before launching it.

Also make sure to remember to let go at the right angle. Try to look at when your hand lets go and for this you need to do it slowly.

If you have problems hitting your target, start from a shorter distance to the target, and do the techniques slower.

Always remember, using this tool is like throwing a baseball or airplane. You can practice with those before you try using it! 

Finally, here’s how it should look:

spartan spear throw step by step

Again, practice that motion, get the feel of this before you do it on the race. It’s honestly not that difficult, you just really have to imagine throwing a paper airplane. You can honestly practice with THAT if you don’t have space to practice with an actual spear or stick. Read more on the obstacles of the Spartan Race.

Also the pictures used to show my technique were taken when I ran the Spartan Beast

What Are The Best Shoes to Wear For a Mud Run?

what are the best shoes to wear for a mud run

Of the most essential things to wear for a mud run, shoes are probably the most important. But which ones are the best?what are the best shoes to wear for a mud run

Well after having gone through 7 mud runs, the first 4 of which were with regular sneakers (and that was a big mistake), I switched to the Salomon Speedcross 3 and ran my next 3 races with these. It truly changed everything.

Here is what mine look like (a Salomon Speedcross 4 is also available and it is just as good):

While on these events though, I did see a lot of other people wearing these same ones, but also others. Generally speaking, the best kind of mud running shoes are…

Trail running shoes (TRS).

Generally anything you would wear that is designed for hiking or going through off road areas will work pretty well.

Do not put on actual hiking books, put on trail sneakers because they are designed to be water proof, to be resistant to dirt and other things you’ll encounter in nature and they are also very durable. But they are also designed to help you keep moving, no matter what environment you cross.

The first 2 mud runs I ran were MudManX and the Survival Race. I wore basketball sneakers for both those races thinking any kind of foot wear would suffice, but I was wrong and by participating in those events with them, I felt uncomfortable and very dirty.

They didn’t really hurt my feet or cause damage but their design and fabric made them more easily absorbent when I ran through dirt and water, which collected so as I continued with the race, they became heavier and heavier, and much less comfortable to move in.

And in the end, I ended up having to throw them away because there was no way they could be cleaned up enough to be worn again or used for another race, otherwise I’d get blisters and all the dirt that filled up inside them was impossible to get out. 

For my next 2 races (The Spartan Sprint and the Spartan Super), I also wore sneakers, but they were half trail and half casual. They were sketchers sneakers and I actually felt much more comfortable going through the events in them and was able to use them for 2 races straight, but because of the casual aspect they had, they also absorbed a lot of things that made them smelly and because they also weren’t designed to be used in those events, they also got torn up.

One of the other things was when I ran through the slippery areas with dirt, I almost twisted my ankle a few times, especially when going downhill. Obviously, those sneakers aren’t designed for that, but I am fortunate not to have broken my feet which could have happened many times…

My uncle however always wore the very basic kinds of trail running shoes and I was always surprised how much more loose and comfortable he looked when he ran those races with me. Turns out, it wasn’t just that he was physically prepared, it was also because he wore the right things.

And on that note, here is the best clothing to wear is for a mud run.

But anyway, once the switch was made to good mud running shoes (the Salomons), it had a tremendously positive impact on my performance in mud runs!

Are water shoes good for these races?

There’s a lot of moist and watery areas on these races and I have seen people try to go through them wearing regular water shoes. It’s not a good idea.

Going through any of those events in water shoes feels like you’re basically moving around barefoot but have something uncomfortable attached to you. They also get torn up very easily, can slip of your foot, especially on these races and there’s a big chance you get blisters too (usually putting on the right socks prevents this, but with water shoes, you don’t wear socks so everything they collect dries up and hurts your feet).

Water shoes generally are ONLY good for actual walking in water and they can be great for slippery areas such as wet rocks, but you don’t have a lot of that on these courses. In fact, I think the people who make these events try not to include them since they are so easy to slip on (unless there’s rain) so there’s no point in putting them on.

I’ve only seen a few areas with wet rocks, and if you see them on the course, try to avoid them. If it’s raining and you have to cross them, do it very slowly because it can get very dangerous.

So just wear trail running shoes?

Basically. Since these types are the only good ones to wear, you can’t really go wrong with them.

You can get them for about $50-$200 and they will last you for a few races if you’re careful, but most of them are designed for regular trails meaning they are made to be used for regular jogs through the woods and a little hiking. 

Their design is such that they will keep the dirt and a little rain out and their durability will keep them useful to you, but on mud runs, you’re not just going to have that too, but you’re also going to be knee and head deep in dirt, fully submerging yourself into water, back out in the regular environment and then back into the extreme, many times.

All of that really puts the ultimate test on regular trail shoes which is why they will probably last maybe 1 or 2 races and if you really clean them up good, maybe more. But you need something next level of trail running to have the best comfort and long term use for these kinds of races…

But my top pick for the best mud running shoes are still  Salomons:

Remember I mentioned wearing the Salomon Speedcross 3 for 3 mud runs? Well even after doing so, I still own the SAME pair (they are on the right).

You can see the details of how these shoes handled on the 4 mud runs I did but overall, I was amazed at how much easier every single event became thanks to them, simply because they offered me more control and safety over the environments I was running in.

I do believe out of the wide variety of other GOOD mud run shoes I saw on the races I did, the Solomon was the most common.