Why I’ll Never Underestimate The Liberator on Tough Mudder Ever Again!

One of the biggest surprises to me when I did Tough Mudder was how much more difficult the obstacles turned out to be vs when I researched them. The ones I though would be easiest, particularly the wall climbing challenges, all ended up being much more difficult than I though, specifically the liberator.

tough mudder liberator

Looking back at it, I learned that in the future I will need to research any new mud runs I do and their obstacles and as for the ones on Tough Mudder, the next time I do it, at least I won’t make the same mistakes. 

When it came to the liberator, from a distance and from looking at it on videos, it didn’t seem like it would be a problem (don’t know what the liberator is?). After all, what’s so difficult about taking sticks (blunt stakes), sticking them into the holes located all over the wall and just climbing it? 

Well when my team and I ran up to it, I was looking at people who were climbing the wall and most of them just couldn’t seem to do it quickly or comfortably. I honestly though it’s because most of them weren’t prepared, but it wasn’t until I got closer that I noticed how deceptive the obstacle really was…

Apparently, the holes they have on the wall don’t all fit the sticks you get and not all of them are the same size, so while you’re attempting to climb this wall, not only are you guessing where the sticks will fit, but as you’re already on the wall itself, your strength is getting zapped from testing which holes fit.

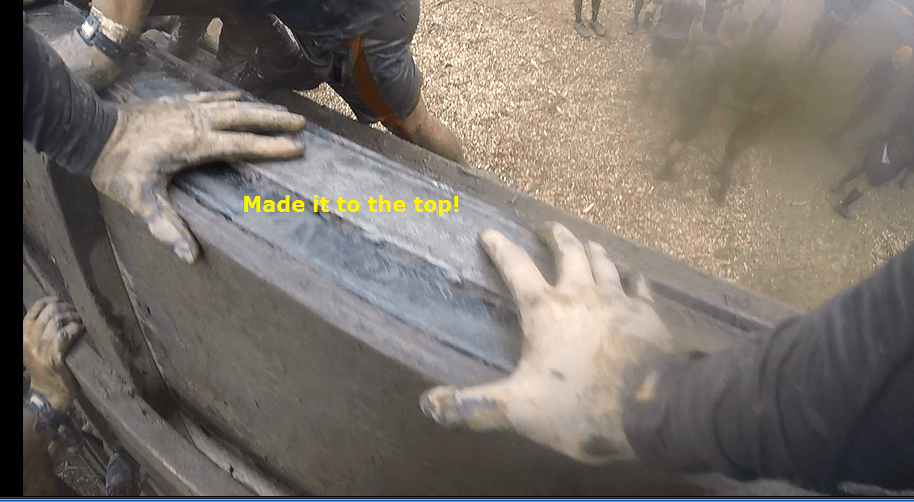
As I was climbing the liberator, I had to improvise my climb and after I got to the top, and started analyzing how next time, I could make it easier, 5 ideas arose. 

The 5 ways to climb the liberator:

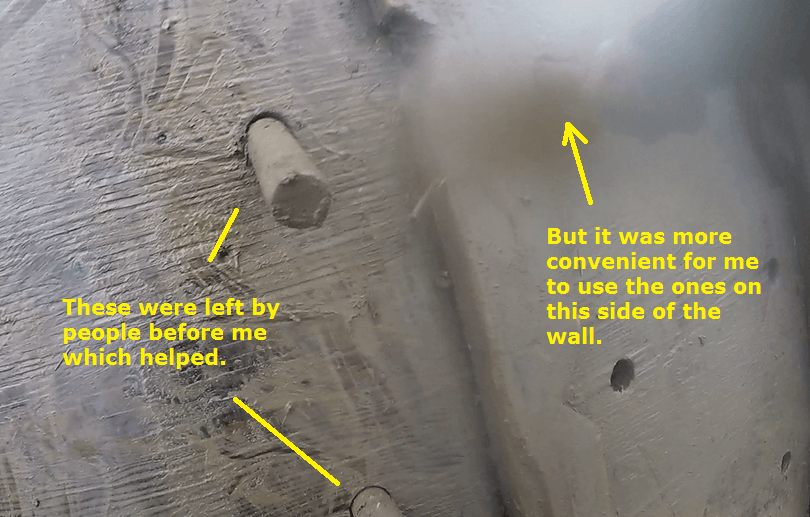
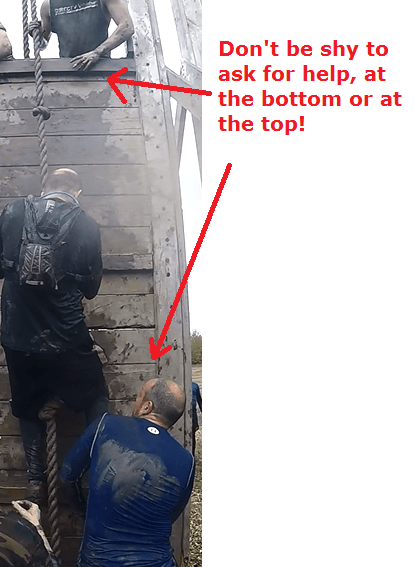
1) Ask the people who are climbing before you to leave whichever stakes stick well inside the holes so you can have an easier time when it’s your turn.

Technically, you’re supposed to start with your own and figure out which ones fit, but if you meet people before you who are nice enough to leave the good ones inside the wall, you’ll climb the liberator a lot faster.

how to climb the liberator tough mudder

2) If you don’t want to or can’t “cheat” the challenge and have to figure out which blunt stakes fit, then use the following for leverage:

The liberator wall itself is divided into about 4-5 sections so that many people can climb it at once. The area which divides each section is a wooden pillar and inside each are triangular openings on several areas designed so you can fit your feet in there.

l2

They aren’t that big in size so don’t think you can hold on for long, but they are a little bit bigger than an adult toe and when you wear sneakers, it’ll be even more difficult to fit them inside, but still, if you can get a foot in, you will be able to alleviate your upper body from always having to hold onto your weight and it’ll also give you a little bit of time to test out which holes fit the stake you have.

If you have the strength, you can also use your hands along these walls and push against them to basically keep you held against the wall without falling. I only recommend this if your stakes don’t work long enough for you to hold on. 

3) If the stakes don’t fit (which often happens) try to find at least one hole where it does, use that hole to “fall” back on if you can’t get any higher. 

Just getting one to fit and using your feet in those triangular openings is enough to keep you at whatever level you’re in at the time for a bit while you figure out how to get higher.

4) You can technically still use the stakes that don’t work and see which holes worked for the people that went before you.

This is kind of what I was using. There aren’t that many options of holes as you’re climbing in your section so it’s not difficult to forget a few areas where the stakes fit in. You can use that to help you get through better, but when it’s your turn, always make sure the ones you use fit perfectly before moving upward as some of the stakes aren’t of the same size. 

5) If the holes which worked were in a different section of the wall, if they are close enough, use them. 

In my situation, I had a person to my right who managed to find a few firm areas that were able to climb through. Because I was running out of strength, I actually was able to reach the ones in the other section and use them for leverage. 

Obviously this happened after they made it to the top so I wasn’t interrupting anyone’s climb as I was doing it.

l4

Do you really need to use all these suggestions on just 1 obstacle?

No, some people may find that they naturally get over the liberator fairly quickly, but there will be the type of people who will be surprised by how slippery and difficult it is to fit the stakes in and use them to climb. Another example of a surprisingly slippery obstacle on Tough Mudder is balls to the wall.

You don’t have to memorize each tip to be prepared for this obstacle, but if you remember a few tips when you get to it, should you get stuck and remember them, you’ll have more ways to get through it and not panic.

And speaking of panicking, while you should be careful when climbing, the liberator isn’t a scary obstacle in my opinion, it is just more technically challenging because of it’s design. 

When you do it, don’t try to scale it quickly, be careful with each step you take upward and make sure you have a firm balance with both your feet and hands before moving further up. 

I have also heard that Tough Mudder is no longer using this obstacle in 2017, but if it is, at least now, you’re more ready!

Note: I did a second Tough Mudder in 2017 and the Liberator was not there, but there were other cool, new obstacles.

How to Conquer Tough Mudder’s Everest on Your First Try.

Everest is an obstacle on Tough Mudder that I personally found to be deceptive in that it looks scary but is actually easier to conquer than most people think.

Here is an awesome picture of my uncle making his first attempt at passing it:

tough mudder everest

And he did it. Then it was my turn.my tough mudder everest jump

Now he weights more than me. I am also faster than him and have a stronger spring when I jump.

So it would be no problem right? Well here’s a great picture he snapped from his Gopro:

In fact, this would become the BEST picture out of all the videos and pictures we took while on Tough Mudder.

However, if I told you that in that moment he captured, that I actually missed the top and fell, and then fell 4 more times, it wouldn’t make this picture that good, but unfortunately that’s what happened, despite my “superior” attributes.

How was it that I failed? And why do so many others fail Everest?

Well after beating it after the 5th or 6th time I tried it, I can finally give you a few tips.

 5 tips that will guarantee you beat Everest:

1) The most obvious tip to this obstacle is the speed you gain while running towards this obstacle and then upwards. It is very important that you not doubt yourself while running towards the wall.

A lot of people I noticed become very intimidated by it because they think they’ll slip and/or the height of it gets to them, so their instincts make them slow down just before they start to run up. Basically the same tips I gave to scale walls apply to Everest as well.

But this is where you need to actually exert all the energy even more. In other words, you have to push even harder on that run leading up to the wall and then get one more push to try and run up as far as you can because the higher you can reach, the easier then next tip will be:

2) Depending on how far up the wall you reach before you naturally start to slip down, you’ll have to spring up. If you’re close enough to the top, you can reach it yourself, if not, there will be people who will grab you. But the spring is something you need to practice at home to get used to the sensation. Maybe run towards a bench at a jogging pace, then step with one foot forward on it, then spring up to practice the motion itself.

3) Do not be afraid to fall along this wall. Remember, I said this wall is deceptive because it’s so high, but after falling multiple times on it, I can tell you that it doesn’t hurt and that you’ll be fine. The arch of the wall makes it so that you fall either on your stomach, back or your side and slide back down. 

Just in case you’re not wearing good shoes, when you start to run up the wall, keep your arms in front of you just in case you slip to avoid hitting your face. But based on all the people I saw go on Everest and slip, none of them had that problem.

4) If you fall once, take a minute before running back up again. I made the mistake to continually try and run up the wall over and over. It’s amazing how quickly Everest 2.0 can exhaust you.

I had to take a break and let other people because I just got tired of exploding up the wall and then falling back down over and over.

5) Make sure if you have ANY weights, to leave them on the side of the wall or give them to a team member who passed this challenge.

If you’ve been wondering why exactly I fell so many times along this obstacle, this was the main reason why.

You see, all along this race, I was carrying my hydration pack with most of our supplies there and it was also filled with water. Overall, there were a few pounds of extra weight that I had to carry and until I reached Everest, I didn’t worry that it would impede me, but each time I ran up the wall and fell, I always though that there was something pulling me back the entire time I was trying to run up as fast as possible.

The funny thing is that the backpack I was carrying was not something that crossed my mind as being the reason because I became so used to carrying it that I forgot it was even on me. You can see in that picture that I had it on me.

Well after catching my breath, after all the falls, I decided it couldn’t hurt if I tried to take it off, so I did and put it on the side, then made my next attempt at scaling Everest.

And wow, what a difference. I ran up that wall so fast that I honestly felt I could have done it without anyone helping me. It was amazing to see how a few pounds of weight made passing this so much harder than it had to be.

So if you’re carrying anything that weights over a pound, give it to someone and you will see a remarkable difference in lightness and weight and it will only add to your spring/speed. 

Now I do want to add that I kept my hydration pack on me for the remainder of the race, but some of the obstacles I had to go over made it tougher to do with the backpack on me. On Tough Mudder specifically, I would say the bag came in handy half the time, but it was still necessary as it held some very important supplies.

On something like the Spartan Race, the bag came in handy 90% of the time. So I do still recommend you keep it on you, but take it off and/or give to someone according to the obstacle/s you have to face. 

Overall Everest can be beaten easily if you practice the motions necessary to run up it, without the fear of falling on it and also without any extra weight on you! 

Even though these tips work, practice beforehand.

It can be easy to read a tutorial on Everest, but it’s more than likely that when you go on your first Tough Mudder and see it, that it can become intimidating and all these tips I gave can be forgotten which is why I am going to give you a practice tip before you attempt it:

You can try to practice wall jumps in areas where its legal and the wall itself doesn’t have to be arched like Everest. Just practice running up to, jumping on a wall to get your body and mind used to the sensation of doing it and if you want to try and recreate the Everest feeling, find a skate board park and try running up the obstacle courses there as it’s pretty close to the one on Tough Mudder.

How to Complete The Bucket Brigade Challenge in The Spartan Race.

One of the most uncomfortable memories of me doing the Spartan Race was challenges that involved lifting heavy rocks, logs and the worst of them all: The bucket brigade.

For me, it was the heaviest challenge out of them all. It was also on the longest up and down climb which made it far worse.

spartan race bucket brigade

What is the bucket brigade (carry)?

It is one of the final obstacles along the Spartan Race route. Basically after getting really tired over the majority of the course, you reach the top of a hill and see empty buckets. In the 3 Spartan Races I did, one which was rained out, but the other 2 being the Super and Beast, the Bucket challenge was right near the end of the course, both times.

You job is to load them up with a bunch of gravel up to about 80-90% of it and then take it down hill and then return them to where you started the challenge so others can go too.

The length of this descent and then ascent is ridiculously long, about a quarter of a mile and is extremely exhausting. Really there’s no easy solution to completing this obstacle, but what you can do is not add to the already uncomfortable hardships this obstacle brings by doing the following things:

1) Practice carrying something that is about 40 lbs well before you start your event.

It’s a great way to prepare you mentally for the hardship bucket brigade brings as well as the other challenges. I believe 40 lbs is what men have to carry, women are allowed to carry lighter weights.

2) Always practice keeping your back straight when holding onto the weight.

The way they want this challenge done is that you have have to hold the bucket in front of you, against your chest at all times. You can hold onto it from the bottom or in the middle. You are not allowed to carry it on top of your shoulders, otherwise, they’ll have you redo the obstacle, that’s how it was for us.

But while carrying it for so long, you’re guaranteed to get tired and start slouching. This is something you have to practice avoiding by doing the first thing above (practicing it). Bending your back which is what I did a number of times along this challenge is what can lead to injuries and back pains later and keep in the mind the event doesn’t end with this challenge, it continues so you need to be healthy and flexible after it.

3) When going downhill, get into a rhythmic walk, when going uphill, take frequent breaks.

The momentum of the downward slope makes it easier to carry it to the bottom, but the second half of this challenge is where you’ll get most tired.

Do NOT blaze through the upward area because that will destroy your legs. Uphill climbs, especially with weights need to be done at a slow pace, but a continuous one.

When you start walking upward, try to get into a rhythmic walk and get a momentum which carries you, rather than forcing yourself to walk. If you find yourself starting to force yourself to take the next step up, stop, put the bucket down, take a break and resume when you’re feeling better.

4) Talk to your team and other people, joke around while doing this challenge.

Why? Because this obstacle is very mentally destructive, especially if you’ve been running for hours prior. I found that by joking and talking to your teammates and other people and positively encouraging them, that it makes this challenge easier.

One of the biggest hurdles to the Spartan Race is the mental aspect of it and besides being physically able to complete it, you may moments like I did where you feel as though you’re ready to break down.

To avoid these moments, again, talk to people along the race, in addition to this obstacle, be positive and take those breaks when you need to. Don’t try to mentally break yourself through something when you need to relax and regather your strength.

5) Keep in mind that you are not allowed to drop a certain amount of gravel.

spartan race bucket carry

There’s a reason they have you fill it up so much, it’s so that when you finish it, however much you had to fill it up with, you can’t drop it along the route to make it less heavy, otherwise it’ll be considered that you didn’t complete the challenge and…you’ll have to redo it.

6) Stretch out before, along and after this challenge.

For me personally, the stress of the race prior put a lot of hardship on my body so going into the bucket brigade was even harder. By stretching out before I started it and several times through it, in addition to after, I prevented serious injury and I recommend you do this too, especially if you’re over 30.

In fact, stretch along the entire event when you can. The less flexible you are entering the next obstacle, the more likely you are to get injuries.

7) Do not look at how far you need to go, because it’ll depress you.

This is the longest and heaviest challenge for the Spartan Race. When I began this challenge and looked at how far I needed to go, it became depressing and it didn’t help me when I continued looking at how much longer I had to go.

Look down often or side to side. If you focus on the momentum on your walk, not how far you have left, you’ll make it mentally easier for yourself to finish this. The same goes for when you go up-hill.

These 7 tips are what I’ll take to the next race.

I had to learn these things the first time I completed a big Spartan Race and keeping them in mind will make the next challenge much easier for myself and you. 

I wasn’t prepared for all the strength heavy challenges the first time, but next time, I definitely will be. Practice lifting the weights so you get used to it, keep a safe form when carrying them and remember how important the mental aspect is! 

Don’t let the bucket brigade stop you from finishing the Spartan Race, good luck!

How to Scale Tough Mudder’s Balls to The Wall Without Breaking Anything!

So balls to the wall was one of the Tough Mudder obstacles which took me by surprise in a bad way.

I had practicedtough mudder balls to the wall for it extensively prior to scaling it on my first Tough Mudder race by working on my grip, seeing the pictures on the main website and not thinking of this challenge as being a big deal.

After all, how difficult could it be to climb a wall when you also have a rope with knots to help you? Not difficult at all consider I climb the rope pretty well as it is.

Then the race came around and this is what really happened:

But what I didn’t consider was what would happen if on the day of the race that same obstacle would end up being covered in extremely slippery dirt such that even grabbing onto the wall or trying to use your feet for support only made it more likely you’d slip and break something

That person climbing on the wall is my uncle. He has awesome grip and if you can tell, he’s not having an easy time with this obstacle either.

And even though neither of us fell (thankfully) my strength really didn’t help me at all here either. On the day of the race, there was a lot of rain and by the time my team and I reached this challenge, there were already enough people who were also wet that went through it that the rope and wall were already slippery enough and with more constant rain and more wet contestants going through it, there was no chance this challenge would be dry enough to complete easily.

The more I tried to get a firm grip and pull myself up, the more quickly I would slip. I dare say this challenge was even harder than the Spartan Race rope climb.

I ended up having to request help from people to lift me up so I could at least reach one of the few knots to get to the top. At least by holding onto a knot, I could maintain a certain height level to maybe reach the top. Thankfully though, there were people at the top who were lending a hand, literally, and I managed to grab hold.

I reached the top but continued to be extremely cautious because of the slipperiness being a constant risk and also because going down the wall on the other end was pretty much structured the same way I came up.

To my recollection, about 90% of all the people who were on this obstacle needed help like I did and many of them looked to be in great shape, but again, that slipperiness cancelled out the strength aspect.  

Because of that 1 factor, I learned that to pass this obstacle and be safe about it, you needed a few things:

 5 ways to beat balls to the wall:balls to the wall tough mudder obstacle

1) If it’s a dry day when you do the race, you’re fortunate. Then your grip and strength will really be enough to get you to the top. 

2) Don’t rely on a dry day to save you. Be prepared to handle this and every other obstacle as though they are in their worst condition possible. In the case of balls to the wall, when you reach this obstacle and it’s your turn to climb, make sure to do a test jump to see if you can grab and hold onto the rope. 

Do not attempt to jump onto the wall and grab the rope and start climbing it without knowing how slippery it is or how good your grip is. This can lead to falls and injuries and it becomes more and more dangerous the higher up you go.

3) Apparently some gloves do help with the slipperiness. I did this challenge without gloves and it was almost impossible for me. However, I also had purchased footballs gloves with a rubber palm and tested it on a few metal bars before the race. 

Turns out, as long as the challenges where they’re climbing (metal poles, ropes, wood), you will have an excellent grip. But if it’s wet, oh boy, put them away and use your hands. 

However, there’s different types of gloves available. My uncle who was also with me and one of the people who boosted me up when my turn came used regular gloves that people use for things like handball, lifting weights, ect… and apparently they actually gave him a better grip.

So do I recommend gloves for this challenge? Well what I do recommend is that you try out a few different ones that you currently have and when you reach this obstacle to first test the grip you have with the gloves on and then off and see which one is more comfortable, then go ahead with the version that gives you a better grip.

4) Use the knots as checkpoints and go slow, very slow. That’s how it worked for me. Climbing that thing in one effort was impossible with the slipperiness so I had to grab onto a knot, pull my body up to it then use that level to reach the next one. 

When you reach the top, you’re not done yet. You have to get your legs over bttw3
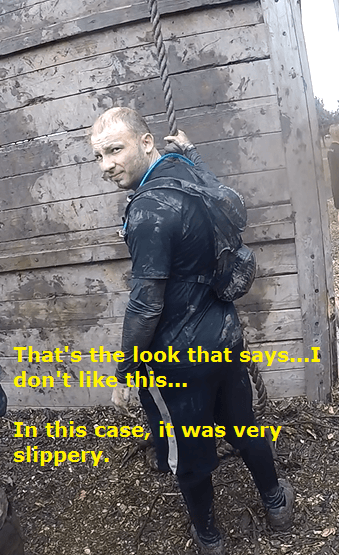
before attempting to go back down or help others. Consider that the wall can also be very slippery and dangerous so go very slow to make sure you have an excellent foothold and aren’t slipping at all. 

When I reached the top, it took me about a minute to slowly pull myself up and over before I attempted to finish the obstacle. This was because every little motion I made had me feeling as though I was about to fall. 

5) Request help from others at the bottom and from the top. Tough Mudder is all about help. If you really see that the obstacle is giving you a hard time, ask for help, whether it be the people who are with you or strangers. Most of the help I got was from strangers and they really helped me with preventing major injuries. Obviously pay it back by also helping them or others when you finish the obstacle. 

Apply these cautious approaches to all the obstacles!

Balls to the wall wasn’t the only look alike obstacle or one that was slippery for me, there were a bunch and you should use these safety tips, especially when it’s raining. If it is, your obstacles are going to become a lot more dangerous and difficult, but it doesn’t mean you can’t beat them. Always focus on being prepared!

And another thing. Though I usually recommend good mud run shoes like these, they didn’t really help me here because the wooden wall was wet, which made is extremely slippery for just about any shoe.

Is Bone Frog The Most Difficult Mud Run Ever Made?

Bone Frog is a relatively new challenge that started a few years ago that is right up there with many difficult mud runs but is it the most difficult OCR race to date? 

As an update, this mud run has become very popular and is still going. But once again, is it the most difficult OCR?

Well it depends on how many mud runs you’ve personally done, and more importantly which ones you did. I’ve personally done 7 and while Bone Frog is not one of them (yet), I have done truly difficult ones like the Spartan Beast and one could say it’s comparable to this one.

Most of the other popular mud runs are not at the level Bone Frog is at so if you’re going to compare this race to something, it’s gotta be something that is around that level which is why we’ll be comparing vs the Spartan Race, Tough Mudder and Battle Frog.

Personally I have done 2 of those events (3 Spartans and 2 Tough Mudders) and will be looking to take on my first Bone Frog challenge when it’s near my area, but I have had a chance to look at the obstacles and compare them to the ones I’ve done on other OCR’s.

Basic info on Bone Frog:

This is another obstacle course that was made to mimic the types of challenges special forces people face, specifically NAVY Seals. To partake in this event, you have 3 choices:

  • A “regular” Sprint: 3 miles, possibly a little bit longer.
  • The challenge which is 9 miles and also maybe slightly longer in distance.
  • And the final one called “Tier 1” that is over 12 miles long. 

Obviously the more difficult level you pick, the harder it will be and the more obstacles you’ll go through so choose your level according to your fitness level (and experience).

Do note, this is NOT BattleFrog:

There are many people, myself included who mistake these 2 events. They are not the same, they have completely different layouts and obstacles, although both were structured based off army challenges and also BattleFrog is currently cancelled. 

Unique challenges of this event:

What I like about this event is that there’s more obstacles overall than in any other mud run I’ve done before. Even the longest ones I’ve finished have about 20-30 per race.

And despite a “lack” of obstacles, the hardest ones focus mainly on hiking mountains which is difficult, but it kind of feels like a rip off when there’s no many actual obstacles along the way to make paying so much to compete in it worth it.

Luckily in this event, you get more obstacles (There’s over 30 here, at least on Tier 1) and you’re on a mountain. Now many of them are common to ones in the Spartan Race such as carrying bags, lifting bags with ropes, barbed wire challenges and obviously scaling different kinds of walls (vertical or angled), but here are some I found to be completely new to any other OCR’s I’ve done:

1) A long 20-30 horizontal monkey bar. The difference between this and normal monkey bar challenges is that you’re about 20 feet above the ground. Although there is a safety at the bottom should you fall, this is the only obstacle I’ve ever seen in an OCR that’s this long and high up.

2) Scaling across a rope, but above water. I believe it is called “Traverse”. This was somewhat similar in the Spartan race but here you scale from one point to another over or under a rope, but here, over water. Your weight may actually pull you down so much that you’ll be “swimming” across while you scale across. You may actually be able to finish this by only using your hands and having the rest of your body be submerged in the water.

3) Moving onto other obstacles that involve a rope…there’s one that is involves you scaling it down (head first) after you climb up to reach the top of it.

4) Doing burpees, but they call it heroes. If you ever did burpees (or the Spartan Race where they are mandatory for each failed obstacle), then you’ll do the same thing here, but this counts as a separate obstacle, not a punishment.

5) A “Spider Wall”. So you have conjoined walls with long wooden pillars horizontally on the top (for your hands) and bottom of it (for your feet) and the goal is to get through the entire set of walls without touching the ground.

This one is also seen on the Spartan Race, except they have small wooden pieces, not long pieces of wood so on the Spartan Race version, it’s a bit harder to do. 

6) Crossing over water but through rafts. If you have ever sat in a lift raft and tried to move around it, you know how difficult and unstable it is. Well in this challenge, you have a bunch of life rafts joined together that make a “bridge” across the water and you have to climb from one raft into another until you reach the other side.

I’ll be adding more and more obstacles especially after I personally take on this mud run! 

So is this mud run the most difficult one yet?

Well based on the distances, location of it, I’d say at best this race is about as difficult as the Spartan Super, and possibly a little bit harder than Tough Mudder

In terms of strength challenges, obstacles, locations and distances, Bone Frog bears a lot of resemblance to the Spartan Race (as you saw, I compared a lot of the obstacles in both events together) particularly as they both have similar distances for their races and involve a lot of carrying of similarly heavy props and finally, there’s also lots of climbing on ropes. 

bone frog vs spartan race

For people who are active mud runners that enjoy challenges, this is one you’re going to want to add to your list. If you have people on your team who are beginners, have them do the 3 mile race. 

The good thing about Bone Frog is that for the most part most of what you need to be prepared for are long, steep hikes and being able to have strong upper body training.

Other than that and good gear, if you’ve experience more than 1 mud run with a distance of about 5+ miles, you should be able to get through Bone Frog, not easily, but you’ll be able to beat it. 

This is definitely a hard event to finish but it’s also very rewarding to beat. They also give you a medal, which honestly, I am looking forward to adding since I only have 2 so far (Spartan and Survival Race, the rest don’t make them.).

bf