Finally it’s happened. I have completed one of the most challenging mud runs in the world: Tough Mudder.
For months I was waiting to compete in this course and after finally doing it, I am ready to fully review it for you guys and let you know how to beat it.
Many of the obstacles took me by surprise, mainly at how intelligently they were designed, with their purpose not really to test your strength, but your ability to work with friends and other Tough Mudders to complete them.
I had previously written on the many obstacles people would face on Tough Mudder here, and before I partook in this event, I had studied them and had a strategy planned. Well when the time came, about half the strategies worked while some required that I improvise.
7 things I totally got right for this race:
1. I definitely wore the RIGHT shoes.
My recommended shoe model was the Salomon Speed Cross 3. It still is.
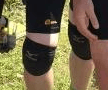
2. Wearing a lot of compression clothing was also the right call.
It helped keep me warm and protected me from anything that could have been inside the mud as well as the electrical wires as even when I got zapped, it didn’t hurt as much if it capped my skin. Everything I had suggested people wear to these events carried me through this race.
3. I was pretty prepared physically!
Despite not finishing some obstacles that I’ll go over, it wasn’t because of a lack of strength but because I didn’t have the right technique, a mistake I’ll fix the next time I do Tough Mudder, but overall the workouts I had planned for this race ended up helping me a lot.
My cardio was definitely more than enough and the only area I lacked was just doing more squats and leg workouts. I had also taken several cold showers before the race. On the day of it, the weather was cloudy with a little drizzle happening throughout the day and it was between 50-60 degrees.
4. I ate the right things before the race happened.
I had 5 cooked eggs and ate a vegetable mix of spinach, arugula and other plants. I drank some tea also. Prior to the race, I had also drank some natural ginger tea I had made. This was to ensure my immune system was strong throughout the race.
On the race, we were fortunate to have nearly each mile include not just a drink of water (and even a sports drink!), but in some cases foods such as bananas and pieces of energy bars.
5. I used the right GoPro.
Specifically the GoPro Hero 4 Black. Most of the pictures you’ll see here were taken by it. Also get yourself a chest and head strap if you want to take it with you, I wore both!
6. I had an awesome team.
One thing that is synonymous with Tough Mudder is team work as I would learn. I didn’t just have 3 other amazing people with me, but I was also humbled at how great the other participants were in helping everyone out. It wasn’t even a matter of favor, it was just the thing everyone was happy to do.
No one got turned down when they needed help and every time you reached out, a hand was always there to help you:
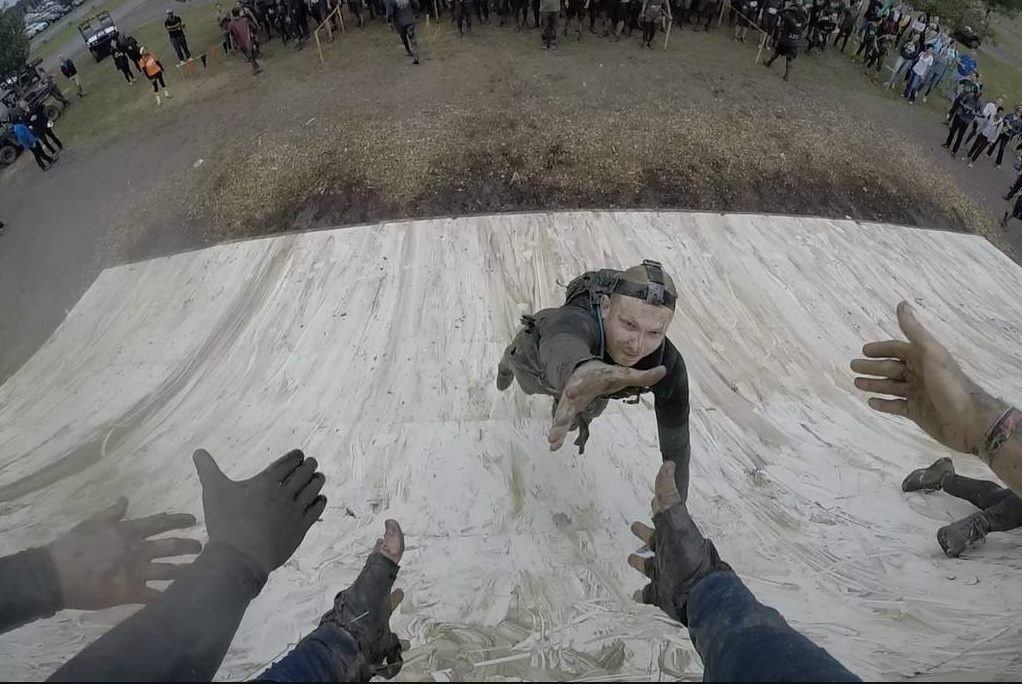
And let me say that obstacle is called Everest and it was one of the many fun ones I’ve tried.
7. I made the right choice in picking this event.
Tough Mudder was one of the final hard races I had yet to try until this past Saturday. It gave me a good idea of how it compared to the other hard and easy races I’ve done before and now I can compare it to it’s most common competitor: The Spartan Race.
And I wrote a comparison between the Spartan Race and Tough Mudder here.
What I got wrong about this race and what adjustments I will make and recommend to you:
Again here is the list of obstacles and details. The only problems we had were on the actual obstacles, so if you get confused by them here, the list will clear up what they look like.
1. I though one of the obstacles, the pyramid would be easy. ..
..
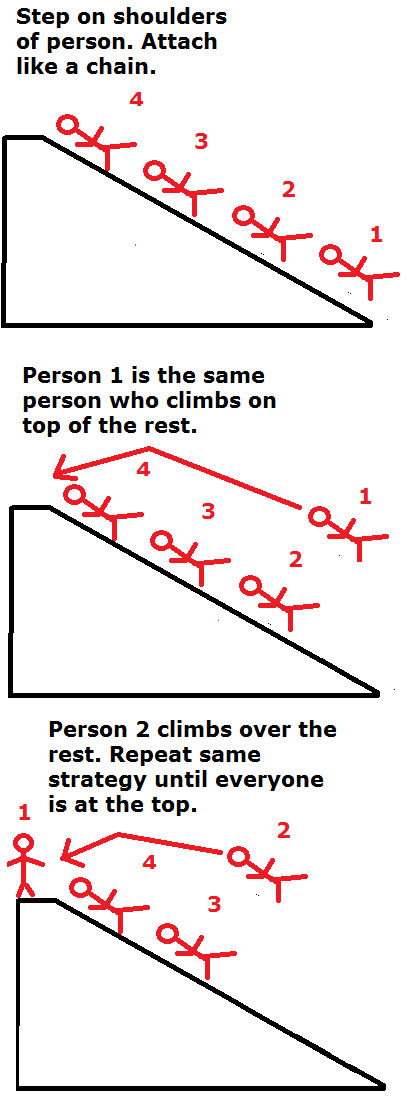 ..
..Without a doubt, this was THE most technical obstacle in the race because you literally had to use most if not your entire team (or someone else’s team members) to help you get through it. Alone, it was impossible unless you had a rope, so here’s how we learned to do it:
The key to the pyramid obstacle is to have at least 4 people do it. Let’s imagine each person is labeled from 1-4.
- Persona 1 lays on their back on the pyramid. Person 2 climbs on top of them (person 1 needs to extend their knees and provide their shoulders for person 2 to step on).
- Then person 3 needs to get on top of both persons 1 and 2 and get on top of person 2’s shoulders.
- Then the last person (4) needs to climb on top of all these people, but this is where the trick to beating the pyramid is most important:
- Person 4 will likely be able to reach the top of the pyramid by then, however, they shouldn’t climb over and finish the obstacle because then the problem is you still have at least 3 other team members who are stuck.
- Instead, to beat the pyramid obstacle, do this: Person 4 who is at the peak of the obstacle has to hold on to the top (Have other people at the top hold you as well for extra grip). Then person 1, the one at the bottom, will climb on top of person 2 and 3, then finally 4 to reach and pass the obstacle.
- After that, the next person at the bottom, now person 2, climbs over person 3 and then 4.
- Then person 3 climbs over 4 and at the final stage, person 4 climbs over, completing the obstacle.
- Should you have more than 4 people, just have the 5th person and anyone after that just climb over the 4 original people laid out on the pyramid, when there’s only the original 4 left, just repeat the same climb upward.
2. The tube obstacle was not scary at all.

What is the tube? Well it’s a small dark tube you have to climb through. Several Tough Mudder events had different variations of this. In some, you had half of it filled with water, in others you had to climb up it, sometimes down, but in the 2016 one I did, you had to sit head first into the tube and use a rope to slide down it.
Now what was I scared of? Well I was a little bit claustrophobic prior to it, but what I got wrong was how much space there actually was inside this tube when I got in.
3. I should have practiced swinging from one monkey bar to another.

Another constantly changing obstacle is the one where you have to climb up a gradually increasing in height monkey bar up and then down. But they changed it this year and had you climb it, then swing or reach to grab a movable pole, then use that pole to grab onto a decreasing in height pole and scale it down.
While I practiced climbing monkey bars a lot and really developed a lot of resilience, I underestimated just how slippery the transition from one pole to the other would be and that’s where I slipped and fell into the water.
As a result, what I recommend practicing when you are good at monkey bars and have excellent grip is to still scale the monkey bars wherever you practice them, but learn to skip a bar and/or swing and let go both arms to grab onto the other (usually one holds onto the next one you grab).
This will help your grip get stronger and help your mind get over the fear of grabbing it in the race.
4. Mud mile could have been easier if I just did “this”.
So basically mud mile was 3 different variations of crawling, climbing and walking over piles of mud. The first one was us jumping through trenches, the second part was crawling through very deep mud and the third was just walking over puddles.
Now the second part, the deep mud area was much more difficult if you tried to step slowly through it. I almost guarantee you’d lose your shoes there if you tried that. The way they made it was that you had to crawl to get over it, BUT someone told my uncle, and then he told me that if you run quickly through on your tippi toes, that would get you over it fast.
5. My Gopro rocked, but I should have taken a few more of “these”.
Apparently lots of people lose their GoPros in Tough Mudder and I think I know one of the reasons why…

One of the ways to attach your GoPro either to your head or chest is to use a special strap, BUT the strap comes with a holder for the camera which you tie in place with a special screw. I had 2 of those screws with me on the race, one for the head and chest and I lost them both because as I went through the course, I would unscrew the camera to check things and each time, there would be more mud piling in the creases, which weakened the hold of the screw.
Eventually I ended up losing BOTH of them and had to hold the camera or give it to someone else to record, otherwise, I’d risk losing it. So the tip is to take at least 5 or more of these screws with you and when possible, WASH the area where you put the screw to remove any mud to improve the hold it will have. These screws are cheap, but they protect an expensive investment!
6. When going on the “King of Swings”…
You can actually reach the bell if you stretch out with one hand before letting go of the pole.

Most people on this obstacle let the momentum of their swing launch them towards the bell. Unfortunately, I tried this and I failed at hitting the bell.
However, one of our teammates tried a different strategy, swung himself on the pole, and just at the moment when the pole reached it’s final point before swinging back, reached out with one hand and whacked the bell successfully, then let go and fell into the water.
So apparently there is enough distance between the end of the pole at it’s final point before it swings back and the bell for you to reach it.
CAUTION:
Be careful NOT to swing back and let go, otherwise you can crash into the area where people are standing on. I saw a few people do this and almost break their necks. Swing forward and if you’re unsure, at least let go when going forward rather than going back.
Should you freak out, start to swing back, don’t let go then, wait until the momentum carries you back forward before letting go!
7. Work your leg muscles, otherwise they’ll hurt like mine do now.
I really though I’d learned my lesson after the Spartan Race so I figured I’d have a similar problem in Tough Mudder, the problem being so many uphill climbs that it would cause my legs to hurt the next day, a lot.
So I did a lot of squats, walked up a lot of stairs instead of taking elevators and hoped it would be enough. Well, I should have done more!
While my legs don’t hurt now as much as they did after the Spartan Race, they still hurt a ton. Luckily I learned that a foam roller would help shorten the pain length so if you also have muscle sores particularly in the legs, the foam roller will be your best friend…
Overall, how did Tough Mudder 2016 rank with the other races I’ve done?
It was a fantastic race. The obstacles like I said were really well designed in many areas and again, I can’t stress how much I loved the team element.
If you enjoy participating with other people in fun events like these and you’re in shape, do Tough Mudder. Do it carefully, slowly and have a great time!
Next up, my team and I will be doing the Spartan BEAST, a 12 mile race. By the way, Tough Mudder was 10 miles for us.
Update: The Spartan Beast was done!
Another update: In 2017, I completed another Tough Mudder (my second one). And in that one, I saw different obstacles and even had a major injury. But I still loved that race, though not as much as the first one I tried here.