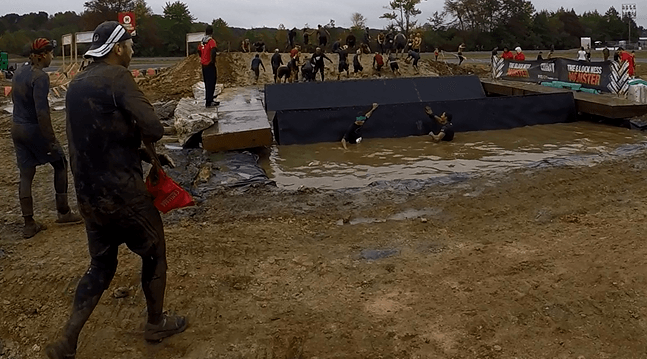
Block Ness Monster is frankly, one of the easier obstacles I experienced on Tough Mudder. Maybe it was because my team and I worked pretty well together or maybe it was because the challenge itself was easy, but aside from it being pretty obvious on how to bypass, lots of people do it different ways.
The way I want to show you that my team and I did it is one I feel is the easier one, saves energy and helps you stay fresh for the remainder of the race. Considering that the blockness monster is somewhere around the middle of a Tough Mudder event (it could shift depending on how they organize the obstacles), it never hurts to have extra energy, and outputting too much on this one is just unnecessary.
I once wrote about this challenge in a topic covering all of Tough Mudder’s obstacles, and I was halfway right about passing it, but the way here is far easier.
Anyway, here is how you should consider going through it:
First, know that you’re going to be jumping in COLD water. When we ran up to it, I got excited because of all the things I saw on it and jumped right in without thinking anything. Well I almost jumped out just as quickly due to how cold it was so be prepared to experienced that. It’s about 3 feet deep.
The next thing depends on how many people are there. Chances are, you and your team are not going to be alone when you do this, so besides working together, it’s ideal that half of you aim to go on the other side, then help the other half get there. So communicate with people, otherwise, it’s going to be annoying for unequal weights to be pushing the block. 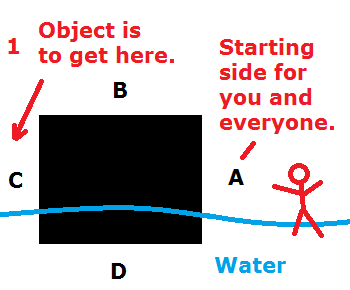
Now we get to the specific technique for passing this challenge.
Let’s consider this:
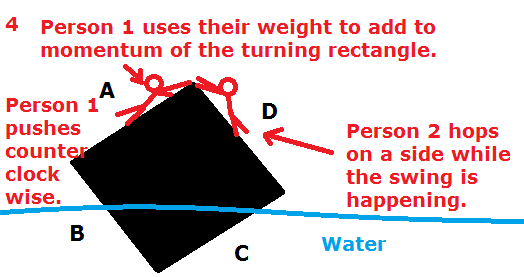
1) The block is a long rectangle and obviously it has 4 sides. Let’s name each side with a letter, A-D. The object is to turn the sides of the rectangle so everyone gets over.
You, your team and whoever is on the same side of the rectangle is on side A and you’re trying to get to side C. You need to rotate that thing counter clockwise (in this case).
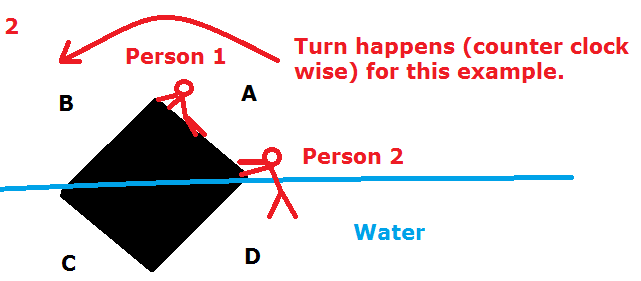
2) Ok so remember the part I said about half the people jumping over to carry the other half over. We’ll keep it simple and only use 2 people, person 1 and 2.
Person 1 jumps on the edge of side B and person 2 is going to lift/push side A counter clock wise. As soon as the block moves a little to the side, person 1 should use that moment to scramble to the his whole body to the edge of B. Before he was holding on with his hands, and now his whole body is locked in that area:
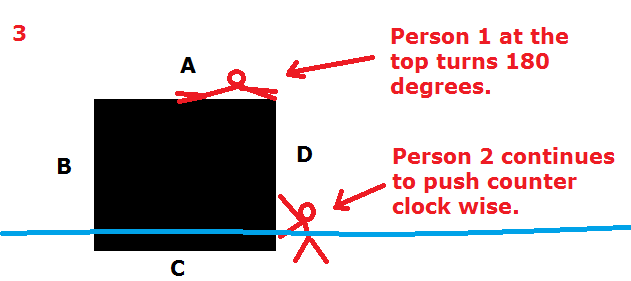
3) Now as person 2 continues to push the block, eventually, it’ll shift sides completely so what was originally B at the top (part 1) will now be A and person 1 will be at the top of it. Now this is where the technique begins.
Most people just jump over to the other side and continue to push the rectangle from that side, which works, but what we accidentally did that turned out to be a little easier was that when person 1 was at the top of the rectangle, instead of jumping over, he needs to rotate 180 degrees and hold onto the corner of A (this will now be the area person 2 was originally pushing).
You’ll see why this turn will make it easier in a moment…
4) Now when the block starts to shift into a diagonal position again, NOW person 2 can either hop on the corner of A (where person 1 is holding) or they can hold onto the corner of D, the next corner. I prefer the the first one which person 1 hangs onto, so it gets done faster.
The job shifts to person 1 now to use the momentum of the rectangle moving to add their weight to it to make it go faster and basically lift person 2 as it happens. They push counter clockwise (same direction).
You see the technique is an energy saver because person 1 doesn’t have to push the other side and get their arms tired, they just naturally use their weight with the swing of the rectangle to carry over person 2:
And from there, it’s simple because the momentum is going to continue until person 2 goes over. And from there, you will need to repeat this on another block or 2, but the technique will be the same.
But that’s all it takes to make this obstacle easy to bypass. I will now show you photos of us doing it, but I used those illustrations because the photos just don’t catch all the details of the technique like the illustrations above do.
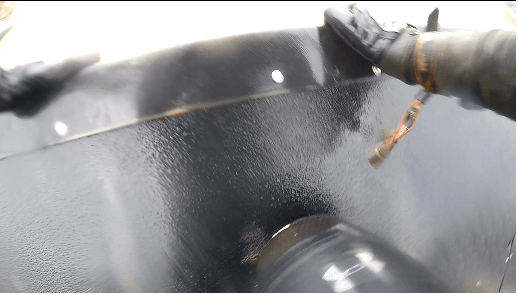
For example, here is me doing part 2, where I was the first to jump up and hold onto the side of the rectangle:
Then I did the switch to the other side (part 3):
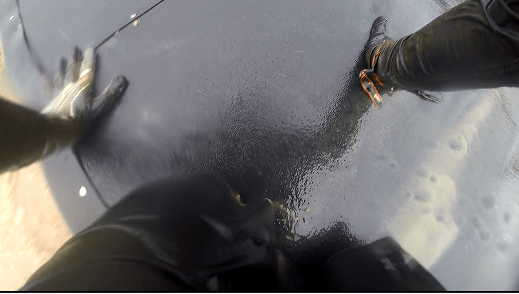
And when the turn was done, I held onto the other side and pushed it with my weight. Here it’s hard to see the whole thing, but the reflection on the block shows me holding on and pushing:
Then as the momentum was happening, I slipped and fell, but luckily it was already at a point where the rest of my team was getting carried over. And one guy to my left was still pulling with his weight down:

As you can see from those series of pictures, it would be VERY hard for me to explain this technique with them.
It wasn’t easy to film this “professionally” with my GoPro so you can see why I had to go with the other cheap illustration as the example.
The first block we went through, we did it the regular way most people do it and you can certainly complete this obstacle that way, but if you’re well into the race and tired, our way may be a little bit easier and saves just that needed amount of energy to carry you through the other obstacles!
Update: Blockness monster is tough only when…
There’s too many people trying to do it who don’t know how. This is what happened when I did a second Tough Mudder event a year later and this time around, when I ran into this obstacle, there were many more people, all trying their own ways to complete it, and this naturally caused confusion, disorganization and a longer time to complete it.
Luckily, a majority of the people doing it figured it out quickly allowing them to help even those who didn’t understand it, to also complete it and it involved using the same strategy I talked about that I used to complete the first one.
We have a tough mudder right by my house, but I did not enter it this time. My friends did and I filmed them doing it. I have had 6 shoulder surgeries so I am not sure if I could handle it. I am fit and strong and do work out, but still…not sure. Can you help answer this question? Do you think I could complete this course with a ‘bad shoulder’? Do they even allow ‘gimps’ 🙂 or should I say partially disabled people, or is this tough mudder simply crazy hard? Thanks for any advice.
-Matt B.
Hi Matty, you can do this race, but there are going to be some obstacles, like the block ness monster, pyramid scheme and a few others which will require shoulder strength to do and if you can’t carry someone or something on your shoulders or can’t hang from a bar, then the obstacles which require that attribute should be avoided.
You should let the people who are supervising each obstacle know about the situation and I’m sure they won’t have a problem with you skipping some of them.
I would say that if your shoulder injury is bad enough, then you may have to avoid about 50% of the obstacles.
Hi, great article, This has piqued my interest in these events. What is the average distance of a Tough Mudder course? Or does it vary from event to event? I am at present more of a strength athlete but getting more into endurance. I like the way you have broken this down, so that if I do come up against this obstacle, I would be better prepared.
There’s a 5 mile one and 10-12 mile distance Karim. Also a few other race versions available.
Thanks for this article. I was signed up for the Tough Mudder course in Seattle a few years ago but transport problems meant I didn’t even get to the starting line.
Have plans to complete a Tough Mudder at one of the UK courses – is there any location (worldwide) which stands out and that you would recommend somebody has to try at some point?
Thanks in advance…
Not really Simon, I would actually say it’s better for beginners to do a Tough Mudder on a flat course first before picking something that has high elevations since that’ll be more difficult. I don’t think there is any particular area in the world where these events are held that are the best, it’s the same kind of course with the same kinds of obstacles in all events.
We have many obstacle races like this around but I’ve never seen or heard of an obstacle like this. IT looks like it takes a lot of teamwork and quick communication which I dig.
Are there specific exercise that you need to do to train for it or would an overall training routine be enough?
Yes, here they are Ryan, preparing with them will help you Tough Mudder.
When we run it in Pittsburgh, its more like 6 feet deep with mud on the bottom. For 5’9 guys like myself, Im treading water and helping when I get to the other side. 3 feet deep completely changes the dynamic.
Wow that’s awesome Dave! It seems like our version of the blockness monster was extremely simple compared to yours!