Among the various obstacles mud runs have, the wall climb is the most common. Throughout many of these races, you will come across it more than once and when you do, it is important to know how to scale them without getting hurt or expending too much energy.
The height of these things in mud runs varies from the small ones which are 4-5 feet to the more higher ones which are about 9 feet tall or more. From a distance as you approach them, it may look easy to scale them, but the deceptive thing about these obstacles is that the closer you get to them, the taller and more scary they’ll look.
Another deceptive thing about them is that as you reach the top and look down, it always looks like the fall is much further than it really is which is why people who have never scaled them easily get scared to even try them.
There are 2 approaches to climbing them in my experience doing mud runs and things like parkour (a sport which is very good for crossing these obstacles) that work very well, but you have to practice them before attempting them on the race.
The beginner method of scaling them:
This strategy works well for walls where you can grab the top by springing your body.
If it’s too high, you can either use the next scaling option or have someone more advanced who reaches the top grab your hand and help you get to it…
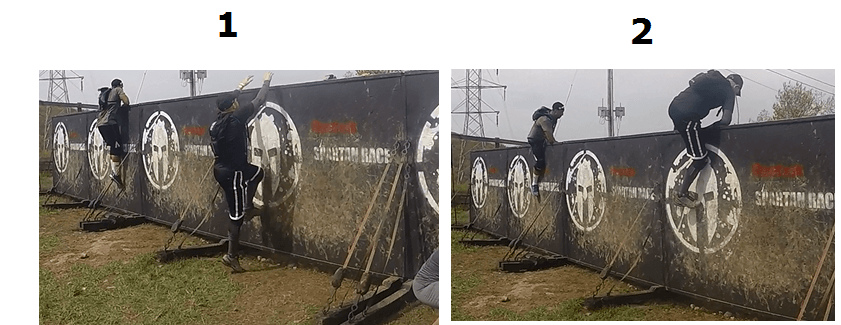
- Walk up to the wall.
- Get a spring and jump. Reach out with your hands to grab the top of the wall.
- As long as you can grab it, the next parts are easy. You may need to work on grip strength to make sure you don’t fall.
- As soon as the grip is secure, use your feet and place them on the wall so that you have grip on it. The grip part is very important because it is going to provide your hands the leverage they need to relax. You will need to wear shoes with good soles on them to have this. Try the Salomon Speed Cross 3.
- While still holding on with your hands, begin to “walk” up to the top, while keeping your hands in the same place. Remember, they are only there for grip for this technique, nothing else. The goal of moving up with the feet is to give your hands a break and save their use for later obstacles.
- As your feet get closer to your hands (the top), your body may angle out and look like a triangle and it will put pressure on your hands the more your body extends out. Again, you need a good grip to maintain this technique.
- But as soon as you feel that one leg can go over the wall, slowly flip the foot over it while the other is still keeping the grip.
- Once one foot is across, your can easily re-adjust your body to be on top of the wall.
- All you need to do is then flip the other foot across and now you’ll be on the other side. As you begin climbing down, you will need to maintain grip until you are close enough to the ground to let go and fall to your feet.
The expert method of scaling these obstructions!
For more advanced mud or parkour runners, this method works better if you:
- Have no help from someone who can grab your hand at the top of the wall.
- This works better if the wall is too high to walk up to and reach with a regular jump.
For this technique, the key is the running start you get. Your goal isn’t to walk up to the obstruction, it’s to run to it.
However, if you don’t stop, you’re just going to crash into it, so the objective is to spring from one foot when you’re about 2-3 feet away from it and aim to land on the wall with the other foot and use the force of the run to push yourself up.
The stronger your run and then spring is, the higher you will be able to reach. You will basically jump diagonally into the obstruction, then while still keeping the momentum launch yourself upward which is why the faster you run, the higher the launch will be.
If your running start and jump was enough for your hands to reach and get a firm hold, you have pretty much completed this technique. The only thing left to do is to scale the rest and you can use the regular method of walking up while holding on with your hands until you get across.
If you’re very good, your running start and jump will be enough not just to reach the top, but keep the momentum of the spring such that you will be able to pull your body up and over the obstruction so your waist is aligned with the top. Then all you have to is get one foot across again.
That is the scarier technique and you should practice it on a smaller obstacle. I’ve been able to use this to scale 12 foot obstacles easy.
Some advanced runners have also been able to continue with the momentum and swing their whole body across without even stopping to put one foot over.
Mud runs make scaling much, much harder:
Regular obstacles outside mud runs aren’t slippery or filled with dirt but expect them to be there when you’re racing. Expect the wall to be slippery, wet, dirty and all those things are going to make those techniques much harder to pull off.
Usually if you can be in the first wave of your race early in the morning or when it’s sunny, there’s more chances the obstacle won’t be as difficult to cross, but in most cases, expect it to be very, very slippery and dangerous.
The best way is to “gauge” if the obstacle is going to be a problem is to let other people go first and see how they’re doing.
- Are they slipping?
- Are people grabbing hold of the top but also slipping?
- Are the people doing it unable to get a grip with their feet (maybe they aren’t using the right shoes)?
If these problems are happening, then you need to be much more cautious when your turn comes. If people were slipping, do the first option of climbing. If they weren’t and you’re more advanced, use the expert approach.
Always try to get a feeling of what it is like to scale these obstacles outside the racing event before you do it.
Other obstacles are on mud runs too, prepare for them…
Scaling walls is just a small kind of obstacle on a mud run. Most of the other obstacles on the race are usually strength related and require these kinds of exercises. Be ready for that and make sure you train yourself to prepare properly for any kind of obstacle a mud run can present!
I’m yet to attempt a mud run, but I’m really interested in completing one in the future. Wall climbs do scare me, especially with how high and slippery they can get. It’s probably mostly a ‘scared of heights’ thing for me. I like your tips on how to scale these walls. Especially the advice of starting early before anyone else has had the chance to put mud and dirt all over the wall, making it even more difficult. When I do find the guts to go a mud run, I will also remember to have a pair of shoes with good grip! Thank you!
Hi
Great article, I’ve been considering attempting a mud run for a while now but just haven’t had the bottle yet as I’ve seen numerous you tube videos of people failing miserably lol. If I sign up for next year then I think I’ll take the expert approach and do the diagonal jump onto the wall, that seems like the way forward so thanks for the info. What is more important in training for this type of event, would it be cardio or weight training ?
Cardio is definitely in my opinion 80% or more of this race. Depending on the race you’re doing, it may have a few or several weight lifting obstacles, but I would also make sure you can lift at least 40 pounds and carry them for at least a 100 feet.
There is a lot of information here that my sister can use. She recently started to show interest in doing outdoor competitions for health reasons and she wanted to know more information about mud runs. How long would it take for my sister to train for mud runs? Would it take months or years?
It would depend on the shape your sister is in Grace. If she can jog a few miles or can do strength training workouts and isn’t out of shape, she should be ready for most mud runs within months.