Although you can waste money and buy a new hydration pack each time one gets dirty, it’s far better to prolong your current one’s use by just cleaning it correctly which there are a few ways to do it.
The easiest way is a basic rinse with soap and other cleaning supplies which I’ll cover with instructions and the more advanced one for when they get too dirty which is the scrub option.
How do know when a hydration pack is dirty?
Either you actually see the color change from inside and outside the bag (usually a greener blue color) or the taste of the water changes to something that tastes like swamp or lake water.
In my case, it’s all of those things since I’ve begun using hydration packs on hikes and mud runs I’ve done. No matter what, in those circumstances, they will almost ALWAYS get dirty, especially on the mud runs.
But even if you don’t do mud runs like myself, anytime you don’t tidy it up after using it, you are already making it dirtier for the next use.
Even if I only fill it up with water and never get it dirty? Yep, here is why:
Even if you never use a hydration pack the way I do and only fill it up with water, carry the hydration pack around, and then empty it, eve when you rinse out the hydration pack, there’s still small drops of water that are left over somewhere.
If they don’t evaporate quickly, they can become stale and if they’re still there when you pour new, fresh water in, it’ll mix with it. Now you’re already going to have water that isn’t 100% fresh.
Also areas where water flows such as the tube can also have areas where not all water leaves and remains, becoming stale. Those things create environments for bacteria and algae.
To prevent this dirt and issue, you have to clean your bag after every use.
The 3 parts of a hydration pack and the easy way to wash them:

The bladder: The bladder is where you fill up all your water. Generally access to it can either be a zip lock mechanism or in my model’s case (CamelBak Rogue), a large circular button you twist off.
Either way, the bladder is always the same for every model. To clean it, fill it up fully with new water, add some baking soda or soap, close it up, shake it, then rinse it out. You can do this twice, but always make sure to do a simple water rinse after so that no soap/baking soda is left. These things do a great job of killing bacteria/algae.
Also if you plan on scrubbing the bag which you should do if there’s a lot of dirt or algae, use a sponge or simple brush.
The tube: Now with the tube, the most general cleaning option is to open up the hole from which you drink the water, either by twisting off the actual suction mechanism or just opening it up just like you would if you were about to drink it, but instead put it under a faucet and let the let the water run.
Keep the opening from where the water goes through up and the rest of the tube down so the water goes in quickly and fills up the space.
The tube will get filled up pretty quickly and some of the water will probably flow into the bladder from there, but that’s ok. Then just keep the opening open and flip the tube upside down. The water will drain out. You can let it drain from the other end which is attached to the bladder, but that’ll just make you have to tidy up the other area again.
You should try this rinse several times. To get soap and baking soda inside the tube, just unplug it from the bladder and valve, and add a few drops if it’s soap or pour the baking soda inside. Then when the water comes in, it’ll mix.
The valve: The valve is a little bit more difficult to clear out because there’s not enough space for a general rinse, so you have to use either a sponge or a more advanced tool like a brush from a hydration pack cleaning kit.
A more advanced cleaning strategy: Using a kit.
Whether it’s the valve or the other parts, eventually you do need to do a much more thorough cleanup of the hydration pack and there is a specially designed kit for this.
![]()
One of these will last you a very long time and keep renewing the quality of the bladder, tube and valve.
These kits come with 4 parts, but 3 of them are brushes:
One of the brushes is for the main bladder. It is gentle, but scrubs out any unnecessary dirt quickly.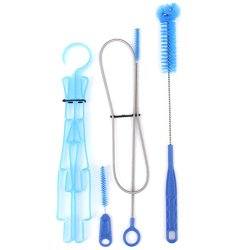
The other is more designed for the tube and has a circle around the end of it for you to hold onto with your finger and a long, skinny and bendable pole that you insert into the tube. The end of this tool also has a brush but it is much smaller but it’ll scrub out everything in the little tube quickly. Some people have tried to use coat hangers as a substitute for this brush. Just get the $5 kit and it’ll be easier…
The last one is made for the valve. This last one is short and has a similar size brush that will do a great job of clearing out anything inside of the valve.
I would invest in one of these $5 kits if you use a hydration pack a lot.
With these options, you’ll be able to keep using your bag for a long time while always maintaining that what you drink is fresh and safe. Should you ever have an issue where there’s a hole or broken part, replacements are always available if you buy through the main merchant.
My CamelBak Rogue’s main site has a page where I can re-buy all of the accessories.
Again, if you’re careful with your hydration pack, make sure it doesn’t get tossed around or falls into areas where it can break or rip, while taking good care of it, you’ll be able to use it for years and even a lifetime. Again, keep one of those cleaning kits around just in case, because eventually your pack will need to be cleaned by them.
Here is how you can use all 3 brushes (just add soap and rinse with water):
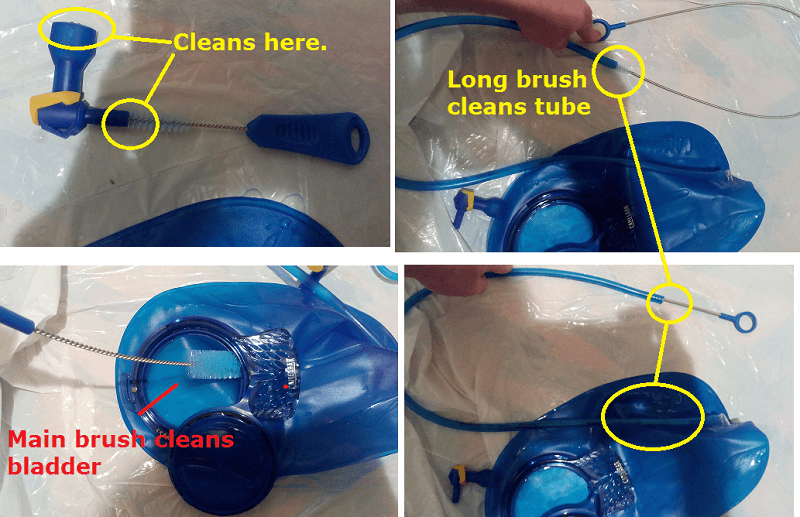
The kit was very easy to use and it scrubs out every little area.
Great tips, especially in regards to cleaning the valve. This is something that I’ve always struggled with because it is just difficult and awkward to clean. I’m going to look into getting one of these kits. Question for you though, how do you store your CamelBak between uses to keep it clean and ready for use the next time?
I just keep it on a coat hanger Nick. When it’s empty and barely weights anything, it can stay up there for as long as you need it to.
I can’t tell you how many of these my kids and I have tossed because they got yucky inside. We live near a military base and these water packs are pretty common, but I hate throwing them away just because they get dirty. Thanks for the info on cleaning them. It was thorough and the directions were easy to follow.
Hi Vitaliy,
Excellent post once again on how to properly clean your hydration pack. I’ve read this post before and I was able to glean quite a bit of useful information out of it.
One thing that I was wondering is how to properly secure food and snacks in my pack when on mudruns, I have had several instances in the past when I have hopped waist deep into mud and it got all into my back pack. Do you have any ideas?
Great post!
If the food you carry can fit into the most secure parts of this bag, then put them there. You don’t really want to carry anything heavy or large on mud runs, maybe energy bars and they’ll fit there.
Thanks for posting such an informative post on Hydration packs. I’ve been using hydration packs for hikes and camping trips over the last several years, and I just thought the sort of swampy taste was normal for them! I mean, I do rinse them out after every usage and hang them to dry, but I guess those slow drying water droplets are still causing some off flavors. I’ll have to give these tips a try and see what I have been missing out on!
I have thought about using a hydration pack before but they seemed more trouble than they are worth to me. Much simpler for me to grab a few waters and throw them in my pack. I can see where it would make sense for a mud run, which I have always wanted to do. Great instructions on how to clean one.