BattleFrog’s Challenging Obstacle List.

Battlefrog is a mud run, but it is not a typical one. For one, it has a unique list of obstacles that are very challenging.

And also that it is the one type of race where it’s shortest course is 8 kilometers, vs the usual 5k’s you find and that it’s more advanced version is basically a loop of the same race over and over.

If you plan on running this course, you’ll want to memorize the following list of obstacles on it and make sure your body and muscles are all ready for it! 

sfws

News: Battlefrog has shut down all of it’s events for the remainder of 2016 and possibly 2017. 

If you are looking for events that are like this, try checking out this list of different mud runs that can challenge you.

3 walls: On the first wall, you have to hop over it, on the second, you crawl or roll under it and finally on the third, there is a hole in the wall and you jump through it.

Usually on other mud runs such as the Spartan Race and the Survival Race, you will see these same kinds of walls, but in Battlefrog, these 3 are part of 1 obstacle.

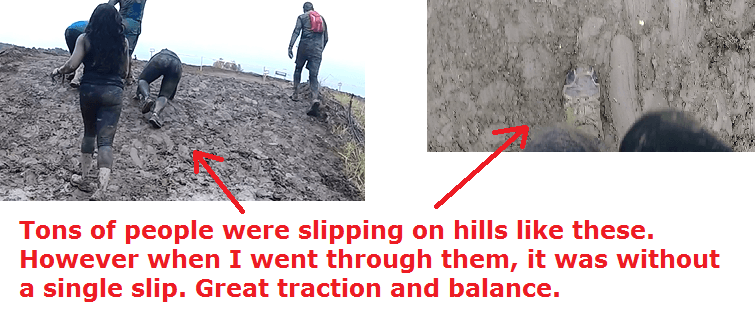
Mounds of grounds: In this area of the race, you are going through dirty water and semi circular dirt mounds that are very slippery. In many mud runs, this is also a common thing to see, but here, sometimes because they are shaped a little bit more circular, the slope is more vertical when climbing, making it very difficult. If you wear shoes with good traction, it’ll be easier. Also practice hiking up steep slopes to improve leg resilience. 

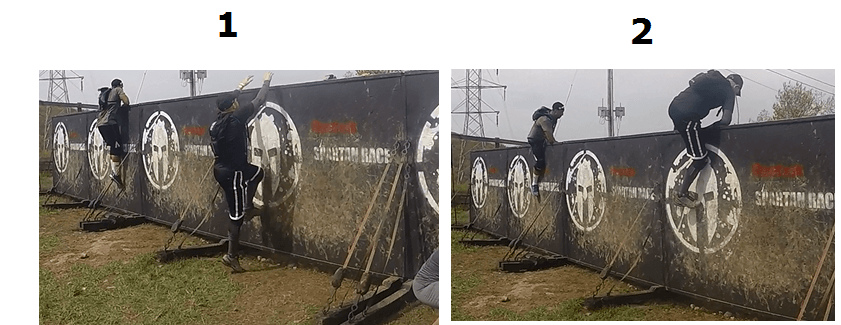
Tip of the spear: This is one of the unique obstacles on Battlefrog!

There are 3 walls here that are diagonally slanted and you have to maneuver on the side of them using ropes on one wall, hanging onto wood on the other and the same kinds of ropes on the third. To complete the course, when you end on the third wall, you ring a bell.

The rope parts are easy and you don’t actually have to climb since the wall is slanted but it’s the second wall where you have to hang onto the wood that makes things very challenging.

Being in an angled position where your legs are bent helps keep the pressure of them. Grip however is going to be a problem, especially on the wooden part, so practice it or use gloves for increased control when you’re on this challenge.

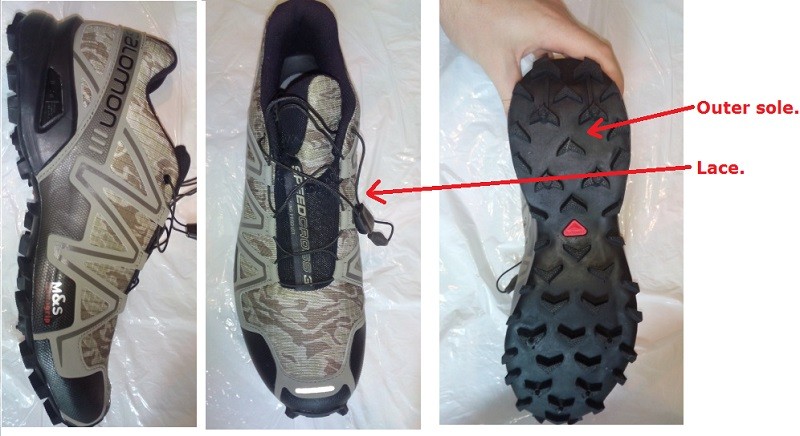
Also because your legs can also get very tired or slip on this obstacle, try to get shoes that have decent traction that help save your energy and avoid slipping. 

Inverted Wall: You climb up the bent side of a wall and cross over the other side. It’s very common on the Spartan Race 

Rope Climb: Only the most difficult mud runs have rope climbing, but on Battlefrog (and on the Spartan Race), you usually climb the rope over water. 

A large wall you climb using a rope: You vertically go up a wall with the help of a rope. There are 2 pieces of wood on it that help your feet, or hands hold onto it so you can complete it, but when you get to the top, you will use another rope and pieces of wood to climb down, just on the other side. 

Carrying a very heavy bag. They call this the “Wreck Bag Carry”.  It maybe a sand bag, but it’s still going to be very heavy and usually they’ll have you carry these over muddy areas.

Slant Wall: Another large wall that is also slanted, but there are not ropes or pieces of wood to help you get above it, you have to depend on getting a good run and jump to reach the top. There are ways to get above this obstacle and it’s actually easier on this race because the wall is slanted, not straight up like in many other mud runs.

The Platinum Rig: This may be the most difficult upper body obstacle in Battlefrog. You have to use your hands to cross monkey bars, rings, wooden and metal poles while being above ground.

This obstacle will activate different parts of your upper body and keep you uncomfortable because once you cross one part, say the monkey bars, it goes into the rings which you have to swing through, then the metal poles which are also extremely difficult. I have seen one of these in Battlefrog have rings on your foot level that you can use to prolong your grip stamina. 

Delta Ladder: I have seen this on the Spartan Race but I think this one is either more slanted. Basically it’s a very tall wooden “ladder” where each part of it is far apart which means you can’t climb it quickly unless you first get a good grip with your hands on the next part of the ladder, stand up, then use your legs to climb up to the next part before reaching up with your hands to get the next one, then after you get to the top, guess what, the only way down is to do the same thing, but rely on your feet to reach to the lower parts of the wood, before using your hands to bring your body down.

A regular tire flip. Well the tire is gigantic so flipping it can get difficult. It is important to get into a squat position before tossing it.

Normandy Jacks: This may have been taken from the popular pictures and movie scenes of the invasion of Normandy where you had large metal “jacks” along the shore as soldiers flooded in, but on Battlefrog, you cross these jacks while being under barb wire and mud.

Large Ladder: This is a completely vertical, wooden ladder that is pretty easy to climb vs the delta one. It is much shorter and easier to maintain a grip. But there may also be a few of these in this obstacle.

60 degree obstacle: It is basically the slanted wall, but it’s made of horizontal wooden poles you use to climb over. This one may be harder than the slanted wall because there are less areas to hold onto with your legs and it’s easier to fall.

Jerry Can Carry: I think the “can” is a pun because like the sandbag carry challenge, here you carry what look like plastic gasoline tanks, but they are filled up and very heavy. You may have to drag them over mud.

Crossing over wooden blocks in the ground: They maybe of different height making it hard for you to maintain a good balance.

2 large pieces of wood, you climb over one then jump onto the other which is higher of the ground and the goal is to swing over. This is actually a scary one because it’s very easy to miss your jump, slip backwards or if you jump over too much, you can flip over and fall too quickly.

It’s better if you first reach out and touch the other wood you’re aiming to jump to and time the jump so that when you hit it, your waist is what goes around it and acts as a balance and your upper body is over one part while your legs are over the other. 

If this challenge is too difficult or too scary, you may be able to get away with using the parts on the side that keep this obstacle together and walk over them and onto the other piece of wood. 

A very skinny caving ladder that you hover under and cross while being over water. If they don’t have this, it may be replace with a rope instead. You may also find a different version of this obstacle where you have to climb up it to ring a bell. Keep in mind these things are not your typical ladder. You may spin around and feel very little control while trying to control it.

There are a few other obstacles on Battlefrog but these are very common on the course. You should prepare for them by doing these exercises and maybe beginning with an 8k or a lower level mud run if you’re not ready.

Any good alternative mud runs to Battlefrog since it’s been shut down?

I would say 3:

1) Bone frog. This is probably the CLOSEST mud run you’ll find to Battlefrog which is still up.

2) Spartan Races. Probably anything Super and higher (Beast and Ultra Beast).

3) Full Tough Mudder race. 10 miles+ and it also has team oriented obstacle courses, which is REALLY fun.

How to Beat All of Rugged Maniac’s Obstacles!

Rugged Maniac is probably one of the few mud run events that has the most obstacles within it’s 5k length.

rugged maniac obstacles

If you go, you may have to cross about 20 or more of them which is way more than most other races. Let me say that I have not completed a Rugged Maniac, but I have done harder mud runs, far harder actually: Spartan Races, Tough Mudder and a lot of others.

In fact, I’ll say that after comparing the obstacles in Rugged Maniac, a lot of them are similar to Tough Mudder I’m not saying this to diminish Rugged Maniac, but I am saying this because I have good experience with mud runs and can help you prepare for this one.

So with that said, I have done the research on this mud run. What are these challenges and will you be ready to beat them? Only if you’re prepared!

All of the obstacles on Rugged Maniac:

Barricades: These are relatively small walls about 5 feet in height that are spread out across the race. Usually most mud runs including this one begin with some sort of barricade to cross. 

Crossing ones that are 5 feet isn’t really difficult and if you’re a beginner, read tips on getting by these types of challenges.

Head scratcher: This challenge is actually quite common in most mud runs but is just named differently. You just crawl in dirt underneath wires. They call it the head scratcher because it can really scratch your head. If you wear a cap or bandanna, you may reduce the risk of scratches. Knee pads will also help.

Beam me up: This is a 10 foot or higher “Wall” where you basically climb a “ladder” vertically. It is a wooden prop that has steps for you to climb onto with your hands and feet and then climb down on. This challenge is must easier if you’re doing it slowly and making sure every single step you put in and every hold you hang onto with your hands is firm. This challenge can be dangerous if you try to blaze through it.

Ninja Escape: It is ironic that they named it this because it’s actually similar to the American Ninja Warrior starting obstacle people cross, except there it’s above water and here it’s above dirt. You jump from one diagonal board to the next. To pass this challenge, it is important to get a decent speed up because the momentum of your speed will make crossing this much easier.  

Pack Mule: This is another obstacle that is similar to other ones on mud runs but just named differently. You carry a sandbag or other weight. Usually carrying it behind your neck makes it easier, but if it gets tiring, switch over to carrying it under your armpit and if that gets tiring, switch it to the other armpit, then back on the neck. Don’t let any part of your body carry these weights for a long period of time, otherwise it can hurt you.

Shoe Catcher: I encountered this type of obstacle on Mud Man X and yes, I did lose my shoe as well! You go through deep, wet dirt that sinks your foot in with each step and when you try to bring the foot out, the suction makes it difficult to do it and it can often have your shoe slip out of your foot.

What helps prevent that in this challenge is to keep your foot at an angle when lifting it. When you keep your foot horizontally in the mud and try to lift it, it can create maximum suction and cause the shoe to get lost.

Pipe Dream: Another common mud run challenge. You crawl through a tube. Sometimes it can have a dirt slope after. Use knee pads to crawl through more easily. This one is common in Tough Mudder so I have tried this.

Commando Crawl: A similar crawl to the head scratcher, only on water.

The trenches: Several “trenches” are dug out in this obstacle and you have to run and jump over them. Usually they aren’t that big in length, maybe a few feet so the more momentum you have when running, the farther you’ll be able to jump over them. 

Napolean Complex: A tall wall almost twice as high as the barricades, but it’s easy to get through because it has 2 wooden poles lined up horizontally on the wall making it easy to step on them and push yourself up. In races like the Spartan Race, these kinds of walls do not have those wooden sicks and you have to rely on jumping all the way to the top.

Speed trap: It is dirty water you have to walk through. It is called a speed trap because if you try to run over it, you will fall in due to the depth of the water. Also you usually won’t be able to see the bottom so if you try to run through it, you can end up falling over into the water. Do it slowly and make sure every step is firmly placed on the ground.

Jacob’s Ladder: It’s actually 2 ladders attached to each other diagonally which you climb through. You should use the same caution on this as on the “beam me up” one.

Quad burners: These are big piles of dirt which you need to walk over. There maybe 3 at some points but they are called quad burners because your legs, especially the quads will get tired. Exercises on stair masters or just walking up staircases can help you here.

Claustrophobia: You crawl and maneuver through a tight space.

Mount Maniac: There is a net you climb on top of, then another net which crosses to the next part of the obstacle and finally another net you climb down on.

Dragnet: Similar to commando crawl, except under a net. 

Tipping point: It’s basically a single man sea saw board you walk over. Obviously maintaining balance while doing it is very important. As you get closer to the middle and out the other side of the board, it will begin to tip. When it does, you should slow down, let it slowly get to the ground, then walk across.

Balance or bust: You walk across wooden pillars over “deep water”. Shoes with good soles help here like the Salomon SpeedCross 3. Water shoes would be the best, but they would not work for the rest of the race. 

Water works: You have dirty water with several poles floating over it which you can technically pass under or climb over.

Let’s cargo: A cargo net obstacle that looks very similar to Jacob’s ladder, but without the wood, only nets.

The Warped Wall: This maybe one of the final hurdles in Rugged Maniac. You have to get a good running start to run up an arched wall that is pretty high. Many times, there’s friendly people at the top willing to help you. Sometimes this obstacle may be one of the last 3 that continually has you climb higher before you reach the big slide:

The Accelerator: This is the big slide that may follow the let’s cargo challenge. It may be about 40-50 feet high but you slide into dirty water.

Leap of faith: You jump into water that’s several feet deep.

Pyromaniac: A very, very common finish line kind obstacle in mud runs where you jump over a small fire. In the Warrior Dash, it is called the Warrior Roast. 

Bang the gong! An obstacle where you jump on a trampoline and use it to hit a gong that is hanging of a rope. Whether you hit it or miss it, you’ll fall into dirty water.

The blogstacle: A net that is over a air filled “balloon” type prop. You use the net to climb over it.

The ringer: It is a very difficult challenge where you have to swing from one ring to another over water. You need to have excellent grip to get through this.

Frog Hop: There are several floating props over water you have to hop through here. I recommend jumping in the middle of the prop to maintain the most balance. Some people prefer to jump on one and stay low before jumping over the next one. It is very easy to fall over if you try to run and jump through this quickly.

The gauntlet: You walk over a slippery area while there are big bag like objects swinging around you. If one of them hits you, you can fall over into the water. You need to learn how to sidestep these bags if they come at you because usually you won’t have enough time to dodge them if they’re coming at you and take this obstacle slowly.

Anti gravity: You jump on a big trampoline onto a wall that is covered in a net which you use to climb.

And those are the obstacles on the Rugged Maniac! Make sure to have all areas of your body prepared for physically for this! 

Rugged Maniac is a fun, mid level mud run that can be very challenging for people, but if you prepare yourself, wear the right clothing and know about these obstacles beforehand, you will have a great time on race day. 

If you have tried Rugged Maniac, what did you think of it!?

And if you’re looking to try this race, here is where you can see which events are being held in your area.

Looking to try other mud runs too? Here’s a list and how difficult each one is. I don’t list ALL the options available, but you will find some of the most popular mud runs on that list.

How to Scale Walls on a Mud Run.

Among the various obstacles mud runs have, the wall climb is the most common. Throughout many of these races, you will come across it more than once and when you do, it is important to know how to scale them without getting hurt or expending too much energy.

The height of these things in mud runs varies from the small ones which are 4-5 feet to the more higher ones which are about 9 feet tall or more. From a distance as you approach them, it may look easy to scale them, but the deceptive thing about these obstacles is that the closer you get to them, the taller and more scary they’ll look.

Another deceptive thing about them is that as you reach the top and look down, it always looks like the fall is much further than it really is which is why people who have never scaled them easily get scared to even try them.

There are 2 approaches to climbing them in my experience doing mud runs and things like parkour (a sport which is very good for crossing these obstacles) that work very well, but you have to practice them before attempting them on the race. 

The beginner method of scaling them:

This strategy works well for walls where you can grab the top by springing your body.

how to scale walls on a mud run

If it’s too high, you can either use the next scaling option or have someone more advanced who reaches the top grab your hand and help you get to it…

  • Walk up to the wall.
  • Get a spring and jump. Reach out with your hands to grab the top of the wall.
  • As long as you can grab it, the next parts are easy. You may need to work on grip strength to make sure you don’t fall.
  • As soon as the grip is secure, use your feet and place them on the wall so that you have grip on it. The grip part is very important because it is going to provide your hands the leverage they need to relax. You will need to wear shoes with good soles on them to have this. Try the Salomon Speed Cross 3.
  • While still holding on with your hands, begin to “walk” up to the top, while keeping your hands in the same place. Remember, they are only there for grip for this technique, nothing else. The goal of moving up with the feet is to give your hands a break and save their use for later obstacles. 
  • As your feet get closer to your hands (the top), your body may angle out and look like a triangle and it will put pressure on your hands the more your body extends out. Again, you need a good grip to maintain this technique.
  • But as soon as you feel that one leg can go over the wall, slowly flip the foot over it while the other is still keeping the grip. 
  • Once one foot is across, your can easily re-adjust your body to be on top of the wall.
  • All you need to do is then flip the other foot across and now you’ll be on the other side. As you begin climbing down, you will need to maintain grip until you are close enough to the ground to let go and fall to your feet. 

The expert method of scaling these obstructions!

For more advanced mud or parkour runners, this method works better if you:

  • Have no help from someone who can grab your hand at the top of the wall.
  • This works better if the wall is too high to walk up to and reach with a regular jump.

For this technique, the key is the running start you get. Your goal isn’t to walk up to the obstruction, it’s to run to it.

However, if you don’t stop, you’re just going to crash into it, so the objective is to spring from one foot when you’re about 2-3 feet away from it and aim to land on the wall with the other foot and use the force of the run to push yourself up.  

The stronger your run and then spring is, the higher you will be able to reach. You will basically jump diagonally into the obstruction, then while still keeping the momentum launch yourself upward which is why the faster you run, the higher the launch will be.

If your running start and jump was enough for your hands to reach and get a firm hold, you have pretty much completed this technique. The only thing left to do is to scale the rest and you can use the regular method of walking up while holding on with your hands until you get across.

If you’re very good, your running start and jump will be enough not just to reach the top, but keep the momentum of the spring such that you will be able to pull your body up and over the obstruction so your waist is aligned with the top. Then all you have to is get one foot across again.

That is the scarier technique and you should practice it on a smaller obstacle. I’ve been able to use this to scale 12 foot obstacles easy.

Some advanced runners have also been able to continue with the momentum and swing their whole body across without even stopping to put one foot over.

Mud runs make scaling much, much harder:

Regular obstacles outside mud runs aren’t slippery or filled with dirt but expect them to be there when you’re racing. Expect the wall to be slippery, wet, dirty and all those things are going to make those techniques much harder to pull off.

Usually if you can be in the first wave of your race early in the morning or when it’s sunny, there’s more chances the obstacle won’t be as difficult to cross, but in most cases, expect it to be very, very slippery and dangerous.

The best way is to “gauge” if the obstacle is going to be a problem is to let other people go first and see how they’re doing. 

  • Are they slipping?
  • Are people grabbing hold of the top but also slipping?
  • Are the people doing it unable to get a grip with their feet (maybe they aren’t using the right shoes)?

If these problems are happening, then you need to be much more cautious when your turn comes. If people were slipping, do the first option of climbing. If they weren’t and you’re more advanced, use the expert approach.

Always try to get a feeling of what it is like to scale these obstacles outside the racing event before you do it. 

Other obstacles are on mud runs too, prepare for them…

Scaling walls is just a small kind of obstacle on a mud run. Most of the other obstacles on the race are usually strength related and require these kinds of exercises. Be ready for that and make sure you train yourself to prepare properly for any kind of obstacle a mud run can present!

Salomon Speedcross 3 Review. How They Saved me on 3 Mud Runs.

ssc3

I own 2 pairs of Salomon Speedcross 3 shoes and I’ve only used one of those pairs to do several mud runs and dozens of hikes. This review will explain why they’re so good.

First, here is how they helped me on Tough Mudder:

I actually did 2 Tough Mudders with these SAME pair, one which was in 2016 and another in 2017.

Here is a picture of me using the Salomon Speedcross 3 on both events (oh and it’s the same pair by the way, these babies are resilient beyond belief and I still have them in 2019, ready to go for the next one):

Describing the experience:

The very first time I used these shoes was in the 2016 Tough Mudder (My first one). I did a few races like that one before, but I really miscalculated and wore some completely unreliable sneakers that almost ended up breaking my feet.

These races will absolutely have you slipping no matter how good your balance is and in the wrong area, that slip can easily lead to an injury.

In anticipation of the 2016 event, I decided that I couldn’t take these crazy risks no more, did some research, saw that the most popular sneaker used in these events was the Salomon Speedcross 3, invested in a pair and never looked back since.

On the day of the race, I was totally BLOWN away at what a difference wearing these things made. People, I’m telling you, if you’re doing a mud run, you need these shoes, period. Here’s just a small list of the immediate things I noticed:

-Incredible balance no matter where I was standing or running through.

-I barely slipped during the race and keep in mind, I ran through dirt, mud, water, and various other things.

-I have to honestly reiterate at how shocked I was at how little I slipped. I was literally sprinting uphills while people were CRAWLING on them…

salmon speedcross 3 on tough mudder event

And here is another picture:

sc34

I was also amazed at how comfortable they were. Even though I was racing for HOURS straight, I never felt discomfort on my feet. 

I though for sure that when I finished the race, that I’d have to throw them out because of how dirty they were, but I decided to put them in a bag, take them home and take my chance at washing them. I am SO glad I did, because they were right back to their awesomeness after a few rinses with soap:

pw

And so they were used again, on the second mud run: A Spartan Beast event.

I was so impressed by the upgraded experience I got from wearing these things, that I ended up taking them on many hikes I did. I even ordered a second pair to keep as a clean alternative (just in case). In hindsight, I didn’t expect my original pair to still last to THIS DAY. I’ve been using the same paid since 2016 and my second pair is still waiting.

But anyway, I will explain some stuff I did while on those hikes in a bit, but the point is, before I did the Spartan Beast, I still used these same shoes again and again, and by the time the Spartan Race rolled around, they were ready to go once again, and once more, after finishing the race, they were washed and ready yet again:

By the way, if you do mud runs and want to know about my personal list of must have clothing, here it is.

Now keep in mind once again that we’re talking about 2 seriously long and difficult mud runs that these shoes went through AND several hikes. And they still keep going and going.

I cannot say enough about the resilience of these things. And again, they are showing NO signs of tear and I am still shocked whenever I look at them…

Onto mud run 3, another Tough Mudder, a year later!

Despite having a second pair available to me, I still decided to take my original pair with me and I was not disappointed again. Basically the same things I said I experience on the first Tough Mudder, I also experienced here (details on the second Tough Mudder). 

Now I will say certain obstacles on both these events have you crossing on narrow pathways and man made props and they are so narrow that you have to tip toe on many of them and in these cases, you really need good balance. No kinds of shoes will save you here, but for the MAJORITY of these races which involves getting into dirty places and having to cross them (like 90% of it), this is where these shoes shine consistently.

Now that I’ve shared my experiences, let me get into details on the Salomon Speedcross 3:

Let me show you what to expect from them, what they look like from different angles and more:


ss

How it looks: I think it looks awesome. In fact, when I did my hikes/mud runs, I did receive a compliments from hikers and fellow runners. 

Who these shoes are for: Regardless if you’re a man or woman, these shoes are available for both.

Different colors available! See which colors suite you best.

There are no shoelaces on these kinds of models, only kevlar. I suggest you put the lace behind the tongue of the sneaker when you’re jogging. Tightening and loosening the laces is easy. I honestly found this to be a HUGE perk for mud runs. Regular shoe laces are going to come untied during these events, but the specific lace system in place for the Salomon Speedcross 3 is completely different and convenient.

I was surprised by the immediate comfort. Usually there is some kind of “break in” period to wearing sneakers but I did not have that with the Salomon, I immediately felt like I had been wearing them for a long time, when I put the on the first time. Putting these sneakers on the first time felt like my feet were stepping on some kind of memory foam mattress in that it felt so natural and comfortable.

The outer sole and mid sole had many bumps on them (I don’t know what the name of this part of the shoe is), but they are made for traction which played an important role later when I began hiking with them.

Besides the Spartan & Tough Mudder Races, see what I put my Salmon sneakers through!

As I said earlier, I did many hikes between the mud runs I completed and here are a few I documented with these shoes on:

The first hike I took with these shoes consisted of 2 stages:

Hiking up a 2,000 foot mountain to reach an outlook. Then driving up to the next hike which was up a large waterfall (over 150 feet high). Total distance of the hike was about 3 miles, but obviously in up and down elevations.  

This hike had many traction testing elements such as:

  • Grass.
  • Wet, slippery grass.
  • Gravel in different varieties.
  • Dry and wet dirt, sometimes about an inch deep.
  • Dry and wet leaves over dirt.
  • Steep climbs up branches of trees. 
  • Hopping in between large rocks.
  • Going through wet, slippery rocks. 

mre

All of those challenges are in a mud run too and on them, some people choose to time themselves so throughout this hike, I was also timing myself to see how fast and comfortably I could jog through many of the obstacles the hike had. 

  • I was jogging up and down the slippery leaves. 
  • I was jogging through the grass, no matter if was dry or wet.
  • I was jogging through the dirt areas and gravel.
  • Many times the ground was mixed in these things and had large rocks which required me to hop on and over.
  • I had times where I would hop of a rock to reach another to make it look like a wall jump obstacle. 

Basically, after seeing what these sneakers did for me on Tough Mudder, I didn’t hesitate to put these sneakers to the test.

More tests: I hiked with these shoes on during the fall/winter seasons (when it’s extra slippery):

wf

Recently I did another hike on the same trail but only in the fall season. Lucky for us (I went with a friend), there was also snow, but in the above picture what I did was dash through a slippery trail, DOWNHILL.

The picture above is a little blurry in areas because I was literally running down that hill (And by the way, I do not recommend you do this unless you have good balance) WHILE holding onto 2 GoPro cameras! Yes, I was really passionate about testing the traction and comfort of these shoes and let me tell you, they passed with flying colors (yet again).

Though my shoes did get dirty, they washed easily and I don’t recall having any slips. You just CANNOT do this with regular sneakers/trail running shoes and I know, because the same friend I hiked with was totally slipping on the same course I was running through as he was wearing regular sneakers.

Another important pro: There’s something different about the energy when you wear these shoes:

What I also noticed was that because I didn’t have tiny, yet dangerous problems like slipping which used to constantly force me to exert energy to readjust and balance myself or the dis-balance from stepping in mixed level ground, I actually ended up having much more stamina left over throughout the hikes and mud runs I did and I really felt like I was dashing, not really jogging through most of the areas. 

Any complaints about the shoes?

scvsws

If there is one thing I found that could have been improved upon, it’s that the Salomon Speedcross 3 is not well suited to crossing wet, large rocks, which for hikes is something you rarely come across unless you’re aiming to cross any area with water.

On obstacle races, it almost never happens (unless it rains and you’re climbing on rocks) and typically courses are designed to avoid that scenario because of the danger of how slippery wet rocks can be.

Now small rocks like gravel, whether they are underwater or wet from rain, those aren’t dangerous, but large ones, that’s when it’s going to get slippery. 

The problem with large wet rocks, besides the slipperiness is the fact that because there is no area for the traction to set in, it becomes very difficult to cross these places. 

I have honestly never heard of any types of sneakers that can conquer large wet rocks, but the Salomon is a bit better at helping you keep your balance vs all those other shoes.

The ONLY kind of footwear I’ve found that helps with large wet rocks is a regular water shoe, but with regards to hiking and doing mud runs with them, forget it, you’re asking to have a horrible experience. I did look for trail sneakers which had the same outersole material as the water shoes, but there are none available. Maybe it’s because they aren’t intended to be used for those kinds of obstacles and tear quickly?

Anyway, should you encounter wet large rocks, your best option is to avoid them. If you have no choice, proceed very slowly through these rocks and ensure you are using your hands for additional balance. 

Other than this issue, I found no problems with the Salamon Speedcross 3.

There are just a PLETHORA of good things to say about them. And I’m not the only one:

sdwwf

Now I do want to say one thing about the reviews you read:

While a overly major amount of people LOVE them like I do, the only common issue I found was that people said that everything is great except the sole wore of quickly.

However, I noticed many of these people were kind of contradicted in their own testimonials because they admitted to using this shoe on things it wasn’t made for, namely…concrete. 

People, why would you want to wear a shoe like this on concrete when the soles are clearly designed for nature? Do not do it! 

Finalizing the pros and cons of the salomon speedcross 3:

Pros:

  • The Salamon Speedcross 3 is just about perfect for any kind of hike. 
  • Where it’s dirt, mud or other things, it conquers pretty much any obstacle nature will have.
  • Extremely comfortable to wear. 
  • The traction is crazy good.
  • Greatly increases safety all outdoor activities because there’s less slips and more balance.
  • This shoe helps preserve your energy.
  • It is rated as the top shoes to wear for Spartan Races and Tough Mudders (I see them worn by a lot of people).
  • There are greater odds you’ll finish your mud run/hike when wearing this.

Cons:

  • Don’t use it for jogging on concrete unless you want your shoe to have a short life span. That literally is the kryptonite of the Salomon SpeedCross 3…
  • Try to avoid large rocks that are slippery or underwater with this or any kind of shoes other than water shoes.

Some final recommendations & other things you can do with these shoes:

If you do outdoor adventures, the Salomon Speedcross 3 will create a completely better & safer experience:

As I said before, I didn’t realize how different wearing a good quality shoe like this one can help my improve my hikes/mud runs until I wore them. So many things changed that I was completed oblivious to before and I am sure if you haven’t worn a pair of shoes like these, for these specific events, you will experience the same thing I did.

These shoes are definitely coming with me on my next hike/mud run and I recommend you take them on yours too!

The conclusion on the Salomon Speed Cross 3:

These shoes proved to match their reputation easily and more. I honestly did not think they would perform this well on the race/s and be in such a great condition afterwards. 

I am curious to see how many races I can keep taking them on. At this point, we’re at 3 mud runs, numerous hikes and counting and like I said, there’s no sign they are slowing down on the quality, it’s still top notch.

I absolutely love these shoes and with all the varieties (including MANY versions/colors for women), I strongly recommend getting them for any outdoor plans you may have.

v

How to Fully Clean a Hydration Pack Including The Tube.

Although you can waste money and buy a new hydration pack each time one gets dirty, it’s far better to prolong your current one’s use by just cleaning it correctly which there are a few ways to do it.

The easiest way is a basic rinse with soap and other cleaning supplies which I’ll cover with instructions and the more advanced one for when they get too dirty which is the scrub option.

How do know when a hydration pack is dirty?

Either you actually see the color change from inside and outside the bag (usually a greener blue color) or the taste of the water changes to something that tastes like swamp or lake water.

In my case, it’s all of those things since I’ve begun using hydration packs on hikes and mud runs I’ve done. No matter what, in those circumstances, they will almost ALWAYS get dirty, especially on the mud runs.

But even if you don’t do mud runs like myself, anytime you don’t tidy it up after using it, you are already making it dirtier for the next use.

Even if I only fill it up with water and never get it dirty? Yep, here is why:

Even if you never use a hydration pack the way I do and only fill it up with water, carry the hydration pack around, and then empty it, eve when you rinse out the hydration pack, there’s still small drops of water that are left over somewhere.

If they don’t evaporate quickly, they can become stale and if they’re still there when you pour new, fresh water in, it’ll mix with it. Now you’re already going to have water that isn’t 100% fresh.

Also areas where water flows such as the tube can also have areas where not all water leaves and remains, becoming stale. Those things create environments for bacteria and algae. 

To prevent this dirt and issue, you have to clean your bag after every use.

The 3 parts of a hydration pack and the easy way to wash them:

parts of a hydration pack bladder


The bladder: The bladder is where you fill up all your water. Generally access to it can either be a zip lock mechanism or in my model’s case (CamelBak Rogue), a large circular button you twist off.

Either way, the bladder is always the same for every model. To clean it, fill it up fully with new water, add some baking soda or soap, close it up, shake it, then rinse it out. You can do this twice, but always make sure to do a simple water rinse after so that no soap/baking soda is left. These things do a great job of killing bacteria/algae.

Also if you plan on scrubbing the bag which you should do if there’s a lot of dirt or algae, use a sponge or simple brush. 

The tube: Now with the tube, the most general cleaning option is to open up the hole from which you drink the water, either by twisting off the actual suction mechanism or just opening it up just like you would if you were about to drink it, but instead put it under a faucet and let the let the water run.

Keep the opening from where the water goes through up and the rest of the tube down so the water goes in quickly and fills up the space.

The tube will get filled up pretty quickly and some of the water will probably flow into the bladder from there, but that’s ok. Then just keep the opening open and flip the tube upside down. The water will drain out. You can let it drain from the other end which is attached to the bladder, but that’ll just make you have to tidy up the other area again.

You should try this rinse several times. To get soap and baking soda inside the tube, just unplug it from the bladder and valve, and add a few drops if it’s soap or pour the baking soda inside. Then when the water comes in, it’ll mix. 

The valve: The valve is a little bit more difficult to clear out because there’s not enough space for a general rinse, so you have to use either a sponge or a more advanced tool like a brush from a hydration pack cleaning kit.

A more advanced cleaning strategy: Using a kit.

Whether it’s the valve or the other parts, eventually you do need to do a much more thorough cleanup of the hydration pack and there is a specially designed kit for this.

ck

One of these will last you a very long time and keep renewing the quality of the bladder, tube and valve.

These kits come with 4 parts, but 3 of them are brushes:

One of the brushes is for the main bladder. It is gentle, but scrubs out any unnecessary dirt quickly.ck

The other is more designed for the tube and has a circle around the end of it for you to hold onto with your finger and a long, skinny and bendable pole that you insert into the tube. The end of this tool also has a brush but it is much smaller but it’ll scrub out everything in the little tube quickly. Some people have tried to use coat hangers as a substitute for this brush. Just get the $5 kit and it’ll be easier…

The last one is made for the valve. This last one is short and has a similar size brush that will do a great job of clearing out anything inside of the valve. 

I would invest in one of these $5 kits if you use a hydration pack a lot. 

With these options, you’ll be able to keep using your bag for a long time while always maintaining that what you drink is fresh and safe. Should you ever have an issue where there’s a hole or broken part, replacements are always available if you buy through the main merchant. 

My CamelBak Rogue’s main site has a page where I can re-buy all of the accessories. 

Again, if you’re careful with your hydration pack, make sure it doesn’t get tossed around or falls into areas where it can break or rip, while taking good care of it, you’ll be able to use it for years and even a lifetime. Again, keep one of those cleaning kits around just in case, because eventually your pack will need to be cleaned by them. 

Here is how you can use all 3 brushes (just add soap and rinse with water):

ht

The kit was very easy to use and it scrubs out every little area.